In this article, we will use an SPA to call API from an App service that will authenticate the token from the SPA and return the data. Additionally, we will create a custom scope to test with our App service
Step 1: Register a multitenant application (If you already have a multitenant app registered in your tenant, please skip this step)
Go to Home > Our tenant > App registrations > New registrations to create a multitenant SPA app. We have written about this in this lab.
Remember to add the Redirect URL in both platform Web and SPA. The Web Redirect URL could be changed after we deploy app service.
If you have already have a single tenant app please follow these instructions to change to multi tenant:
From the list of applications, select the app registration you want to modify
In the left navigation pane, under the Manage section, click on Authentication.
Select the option that represents multi-tenancy. It will usually be described as Accounts in any organizational directory (Any Azure AD directory - Multitenant). This means that users from any Azure AD tenant can use the application, not just users from the tenant where the application is registered.
Publisher verification:
Starting November 9th, 2020 end users will no longer be able to grant consent to newly registered multitenant apps without verified publishers.
Navigate to Home > Our tenant > App registrations > New registrations > Manage > Branding
Within the Branding page, locate the Publisher domain section and click the Add a domain link. You’ll be presented with instructions to verify your domain, which usually involves adding a DNS TXT record to your domain for verification purposes.
After adding the required DNS record, come back to the Azure portal then confirm the domain verification
Once the domain is verified, under the Branding section, you’ll find a Verified publisher field. This should display your verified domain, indicating your publisher details are validated.
Within the Branding page, find the Publisher display name field and enter the name that you wish to display as the publisher for your application.
Still within the Branding page, locate the MPN ID field (or similar, noting that exact names might vary based on updates or changes in the Azure portal). Enter your Microsoft Partner Network ID into this field.
5. Consuming the service
Open your app and use the service consuming tenant to login.
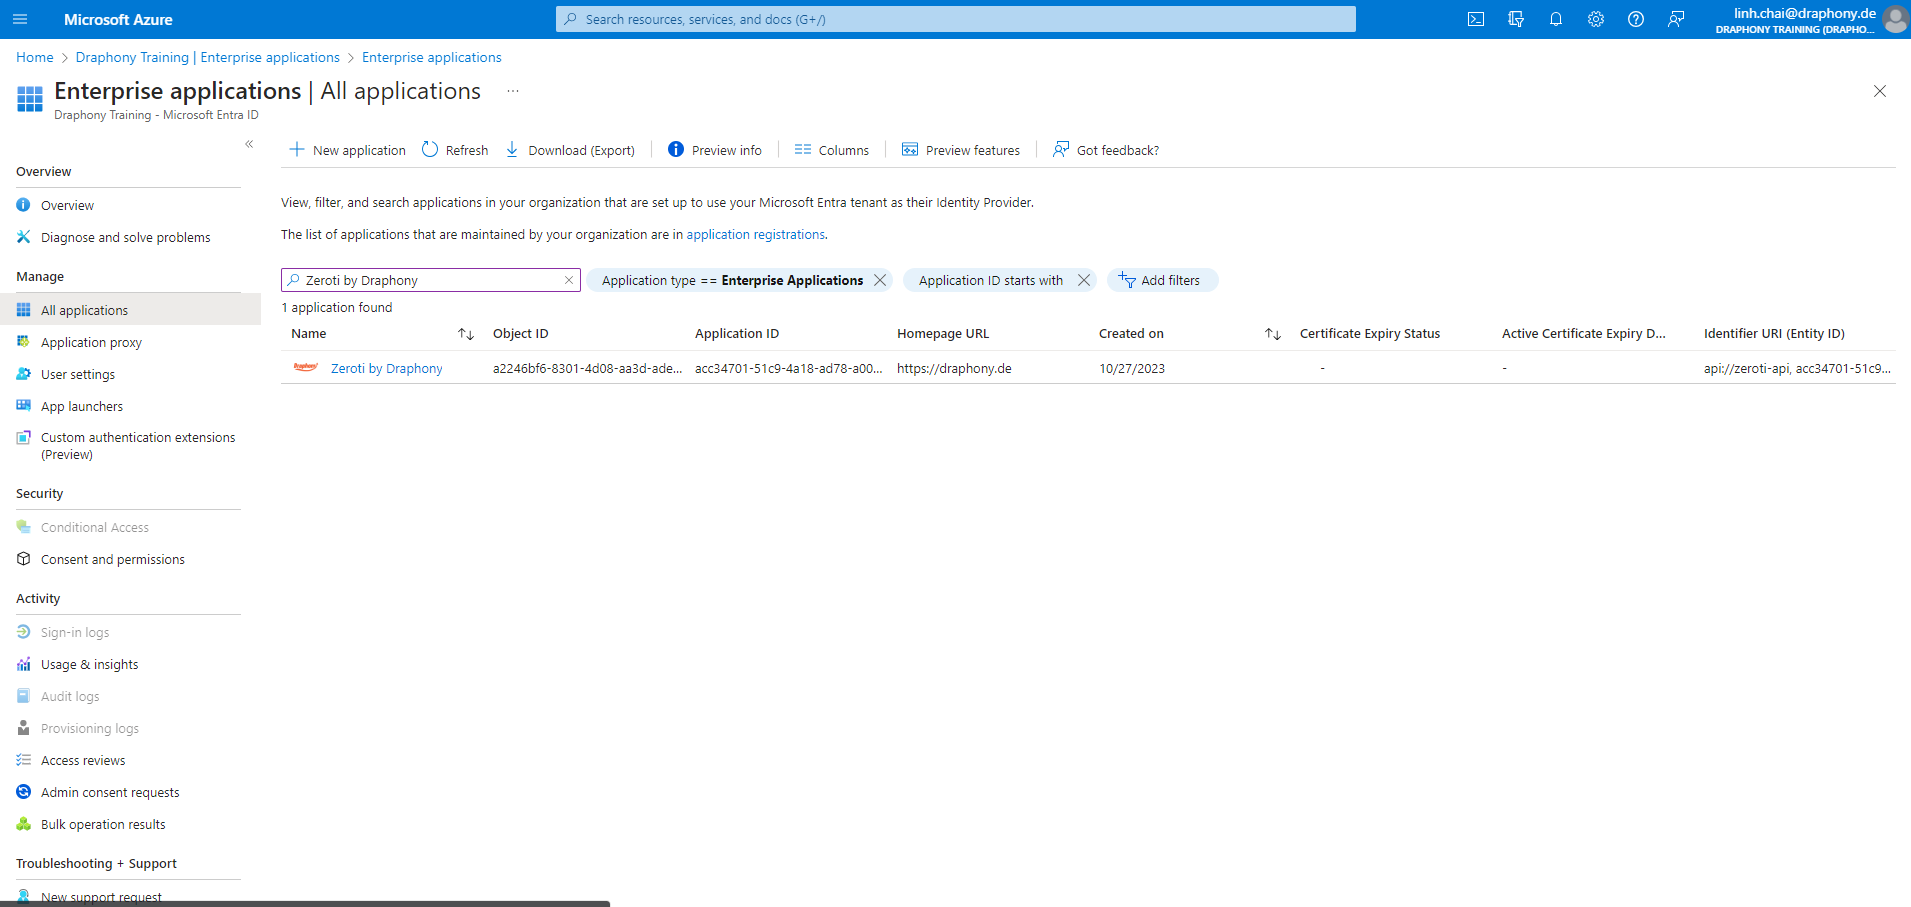
Verify Zeroti has been added to Enterprise App in the service consuming tenant Open, and notice that the client id is the same but the object id is different.
Step 2: Pull code to run in the local environment:
Clone ReactJS SPA
Run git clone https://DraphonyConsulting@dev.azure.com/DraphonyConsulting/BauerAG-AzureAD-DeepDive/_git/lab-2-spa
Create a new .env file based on .env.example file and change environment variables. The REACT_APP_APP_SERVICE_URL can be changed later, after we deploy our app service.
Run npm install
Run npm start
Clone NodeJS App. This step is to see how the NodeJS works in our local environment. When we deploy the app service, we will call api from app service url, not localhost.
Run git clone https://DraphonyConsulting@dev.azure.com/DraphonyConsulting/BauerAG-AzureAD-DeepDive/_git/lab-2-service-implement
Run npm install
Run npm run watch
Run npm run serve (open another terminal window to run)
Step 3: Implementing the features for chai-tea-scope
Let’s go into the NodeJS project and add lines of code to handle if an API has a token with the scope chai-tea.get or chai-tea.post
Create a file name chai-tea.ts in src/routes and let’s do some magic things in this file
Import Required Libraries: Bring in the necessary modules from Express for handling web requests and from the JWT library for token operations.
Add import { Request, Response, Router } from "express";
Add import jwt, { JwtPayload } from "jsonwebtoken";
Initialize the Express Router: Create a new Express router to set up our endpoints. This router will be exported for use in other parts of our application.
Add export const chai = Router();
Set Initial Chai Tea Inventory: We start with 8 units of chai tea. This variable will act as our data store for this example.
Add let chai_tea = 8;
Create the GET Endpoint: Begin defining a GET endpoint that clients will access to request chai tea.
End of POST Endpoint: This closes the callback function for our POST endpoint.
Add });
Adding the new route to the server:
When back to app.ts and add this code to add a new route for the server:
import { chai } from "./routes/chai-tea";
app.use("/chai", chai);
We’ve now set up two secured endpoints: one for serving and one for restocking chai tea, integrating JWT for scope-based access control.
Step 4: Deploy App Service
Create Web Application
We need to have NodeJS application store on Azure repository. You can use git to push code from your local (which you have cloned above) or you can just import it by our repo link.
Now we go to App service > Web app > Create
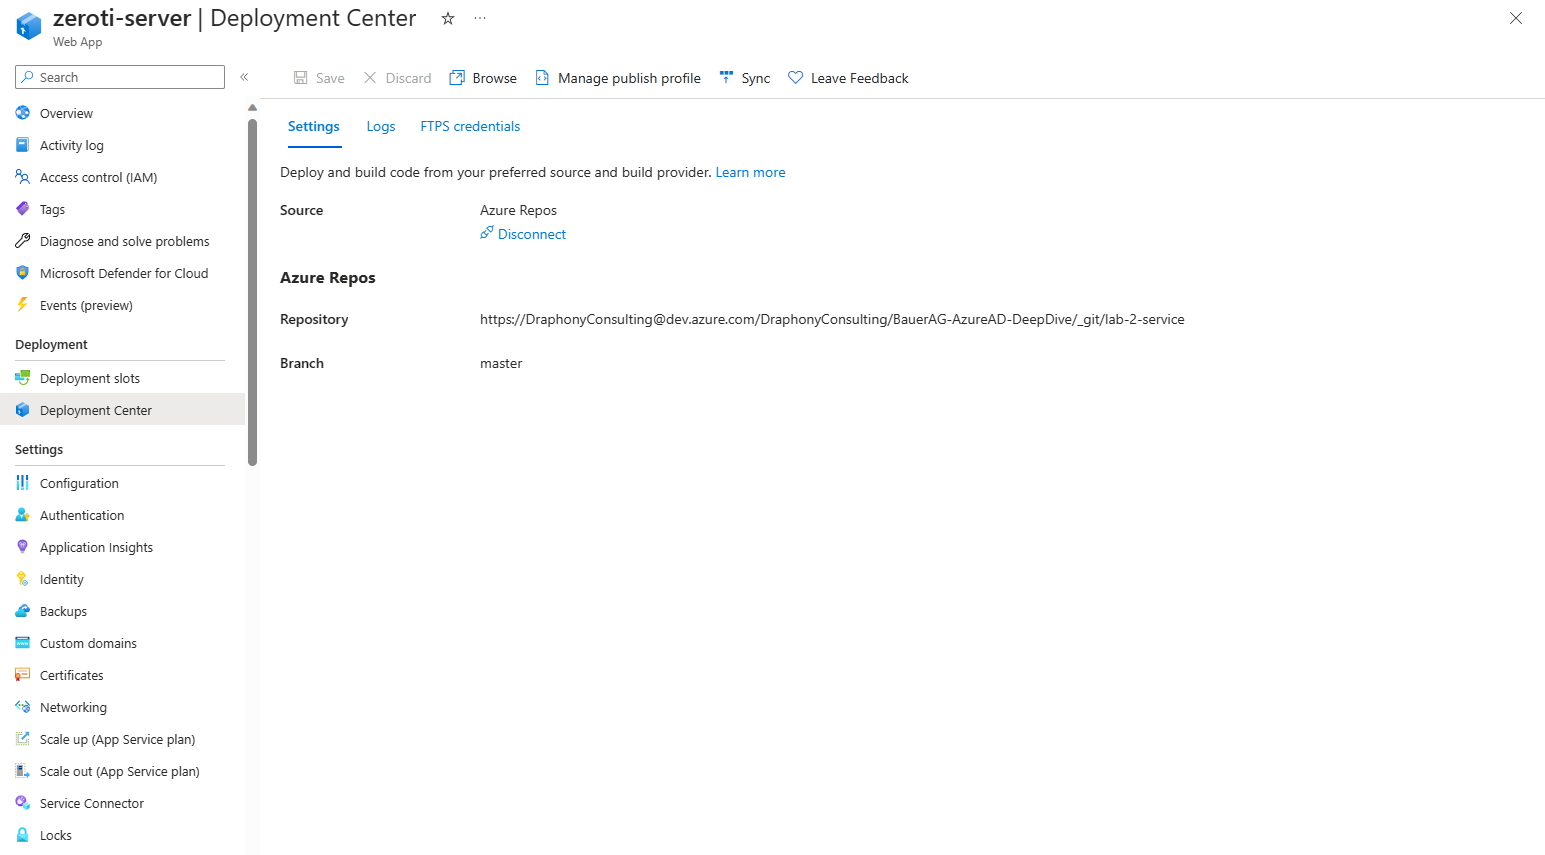
Select your existing subscription, resource group and name the project. In the publish section, choose code because shortly we will deploy the code from Git. 2. Go to Deployment Center to configure Azure Repos to get CI/CD from our NodeJS project on Azure Repository 3. Go to the App Services > Authentication tab, we will add Identity Provider so that our app service will be protected. Each time calling API from the app service, make sure to pass Authorization in Header Bearer <access-token> 4. Add cors in the CORS tab so that our ReactJS SPA can call to this app service. Enter the value of Allowed Origins as * to allow every origins. 5. Get back into App registrations > Authentication and add redirect URL
Step 5: Custom Scopes
Create custom scopes for the current app service, which is chai-tea.get and chai-tea.post
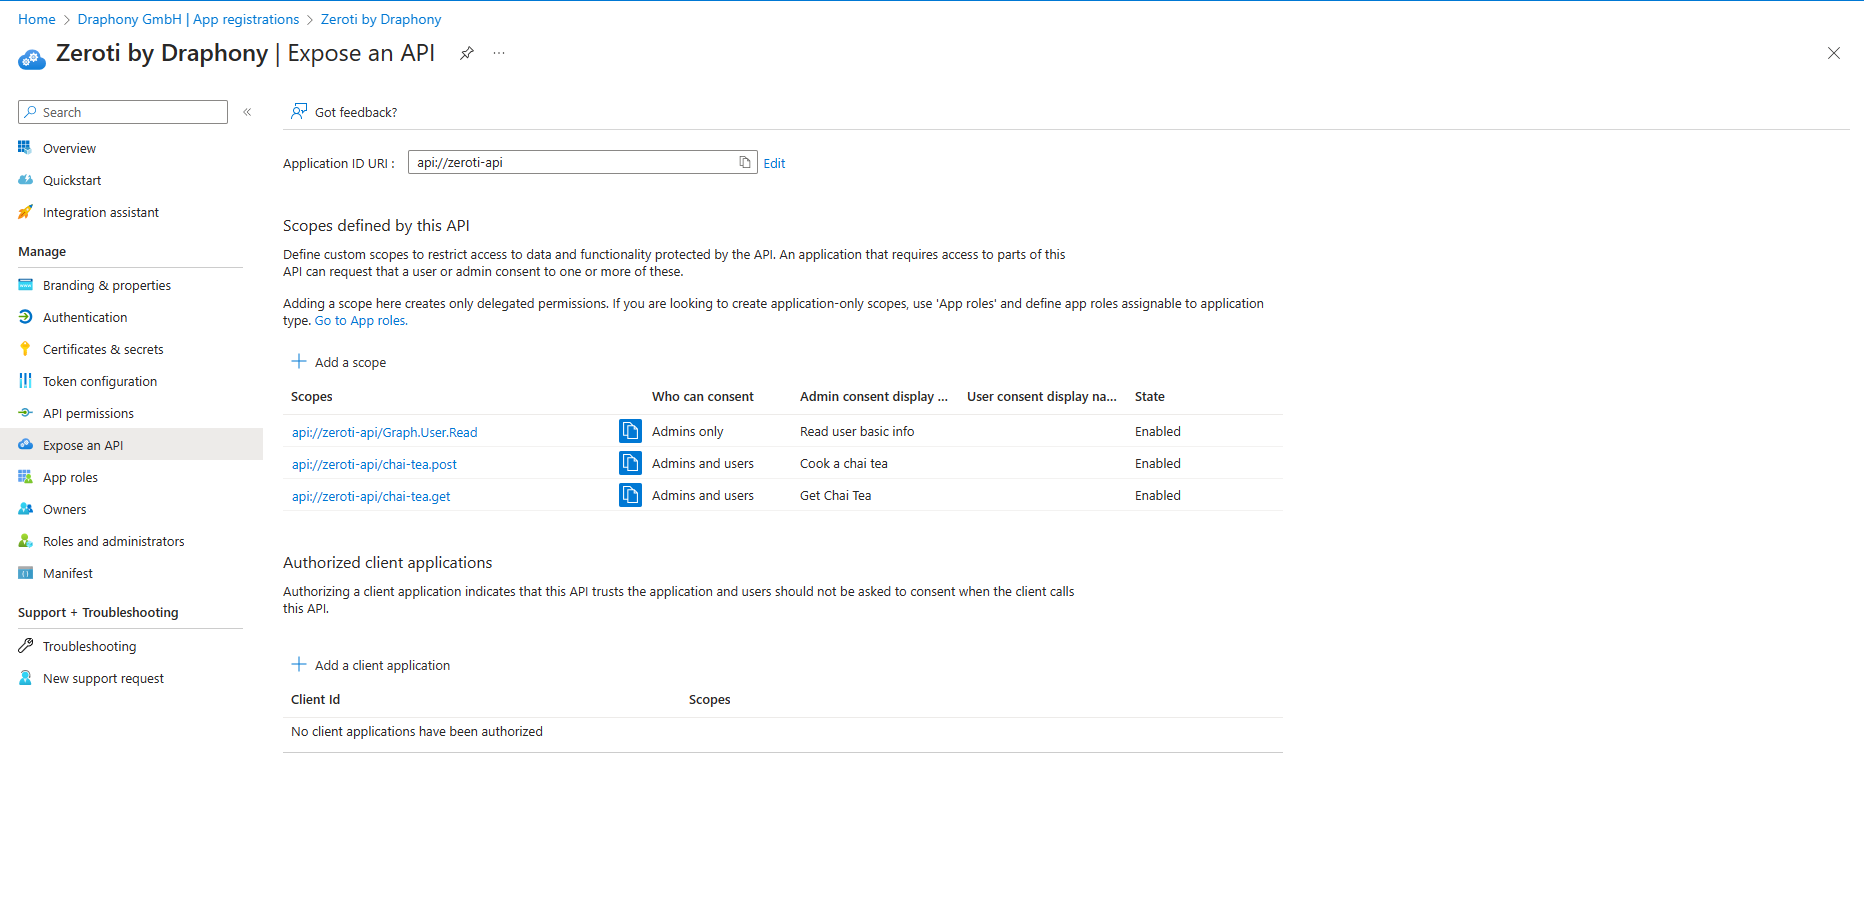
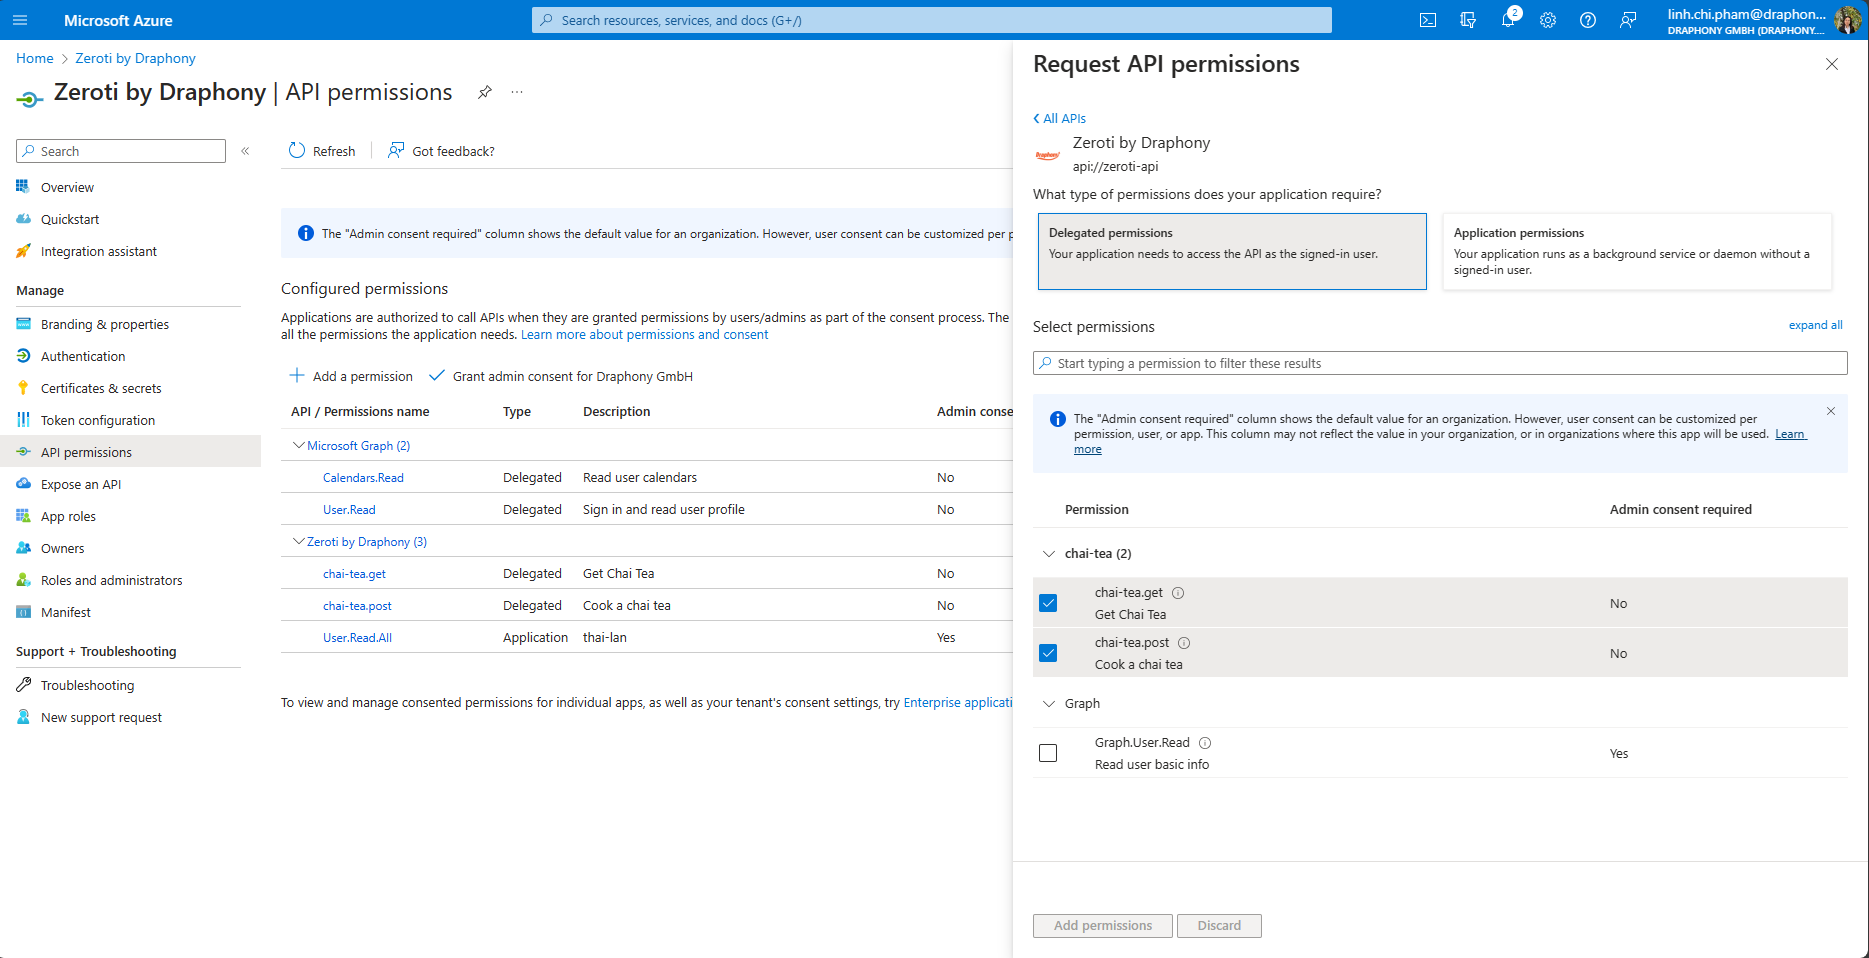
Go to App registrations > <our-app-name> > Expose an API and a scope.
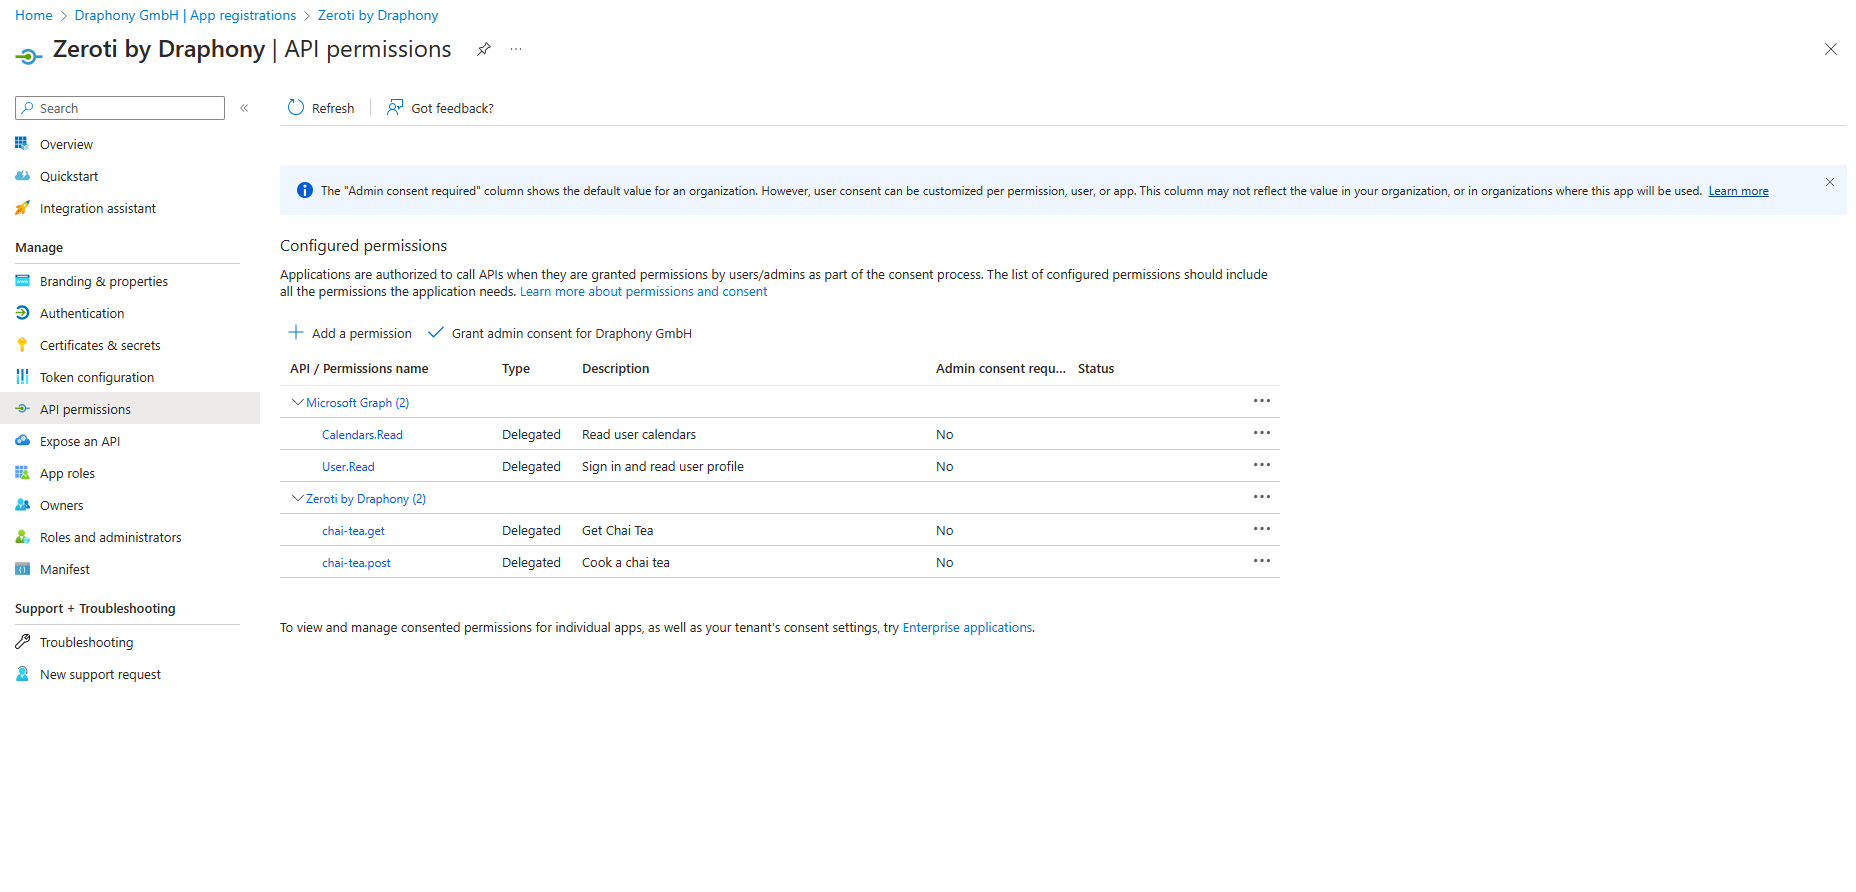
2. Navigate to API permissions to Add permission
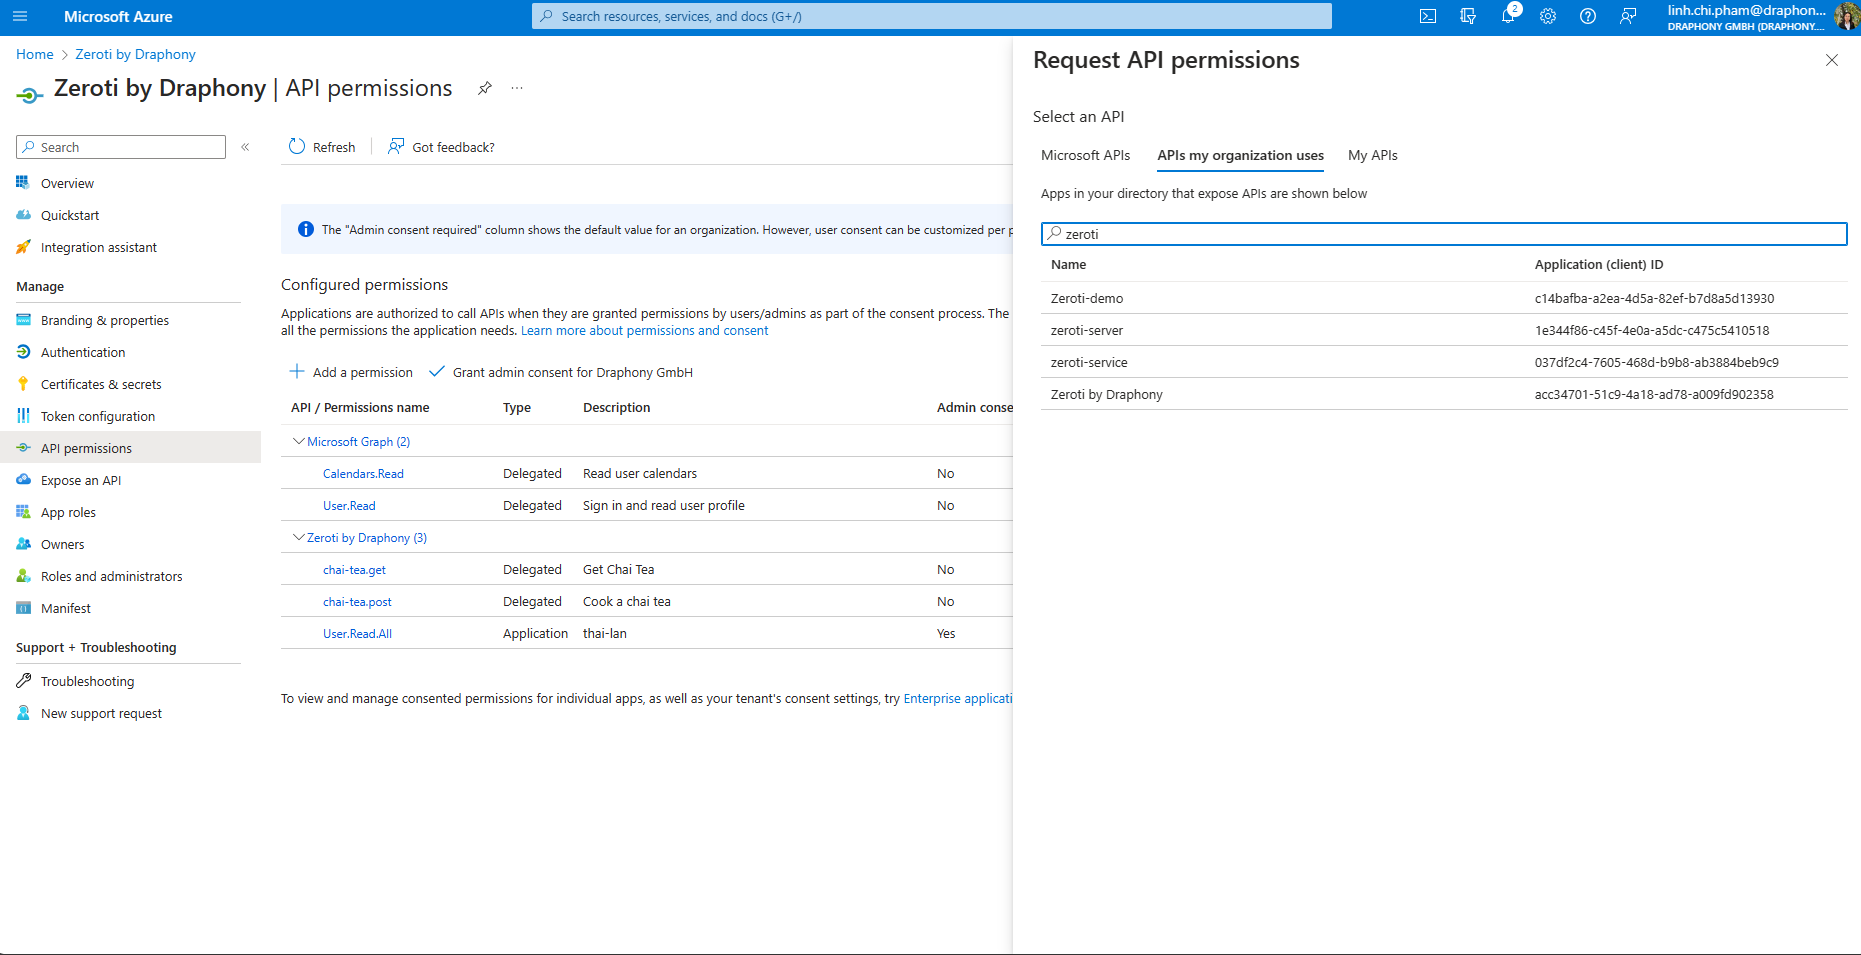
Go in APIs my organization uses tab and find our application
Choose Delegated permissions, and add permissions
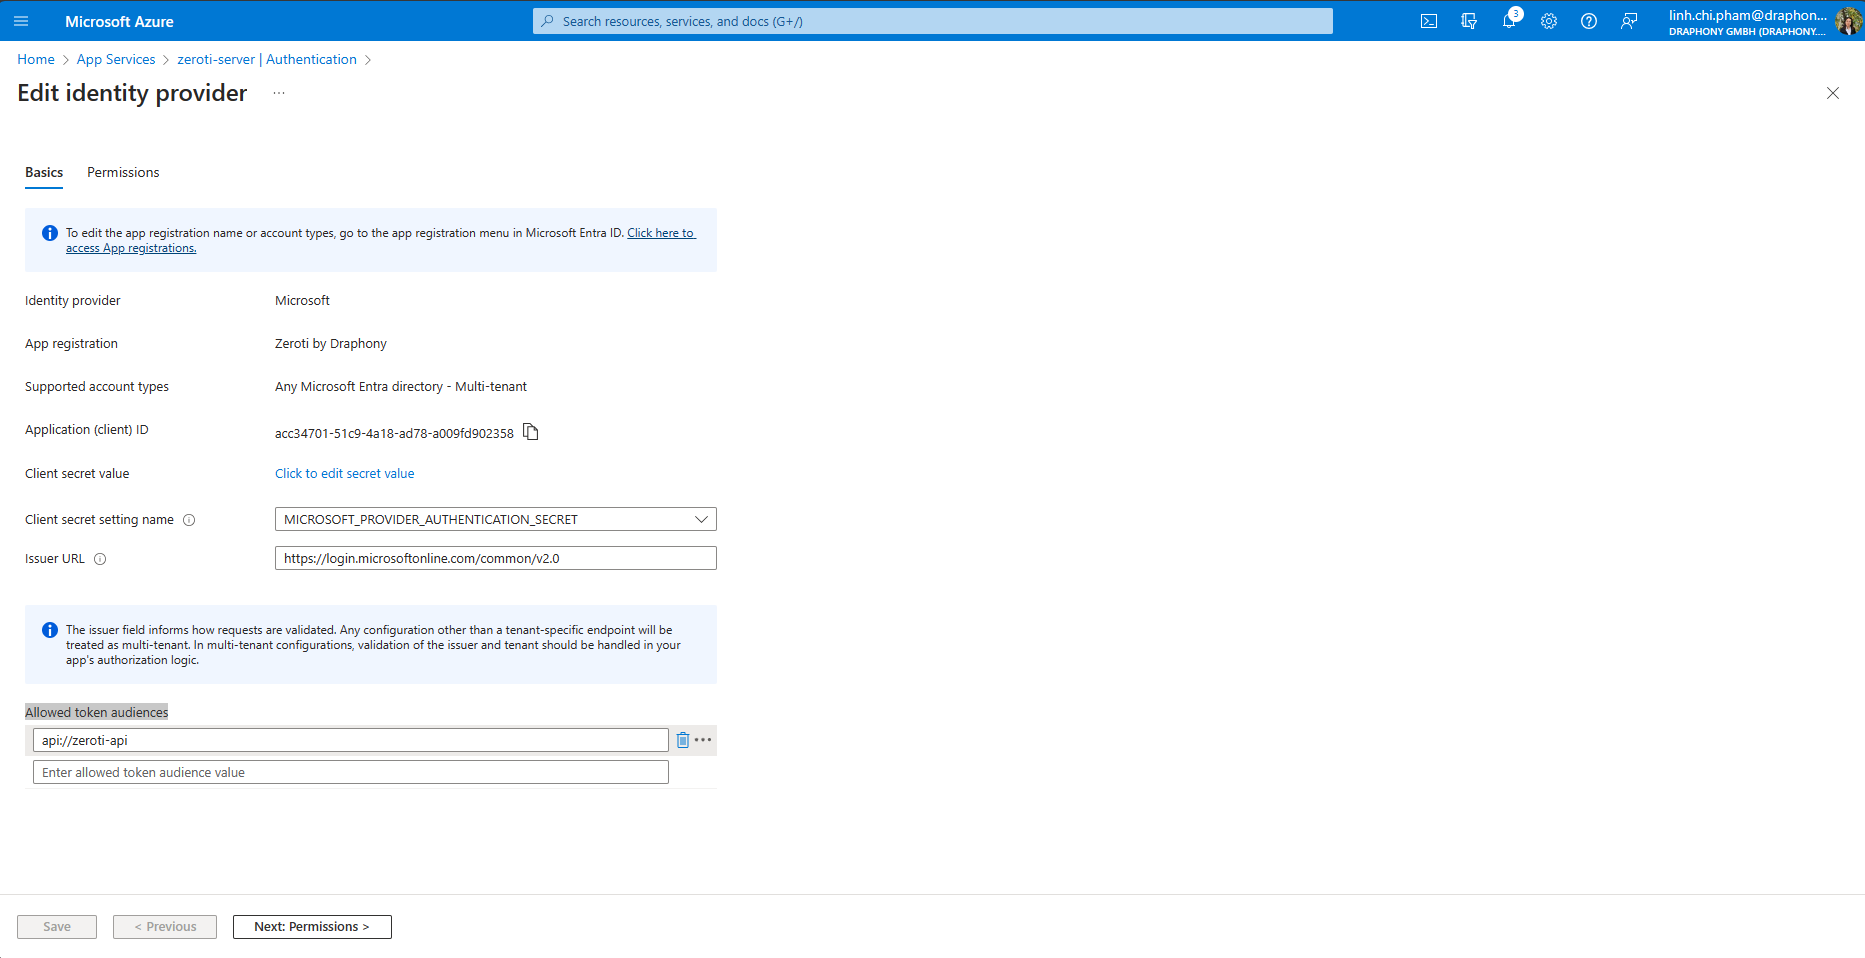
Remember to navigate to Home > App services > Authentication > Edit identity provider to add Allowed token audiences:
Step 6: Use ReactJS SPA and call API to App Service:
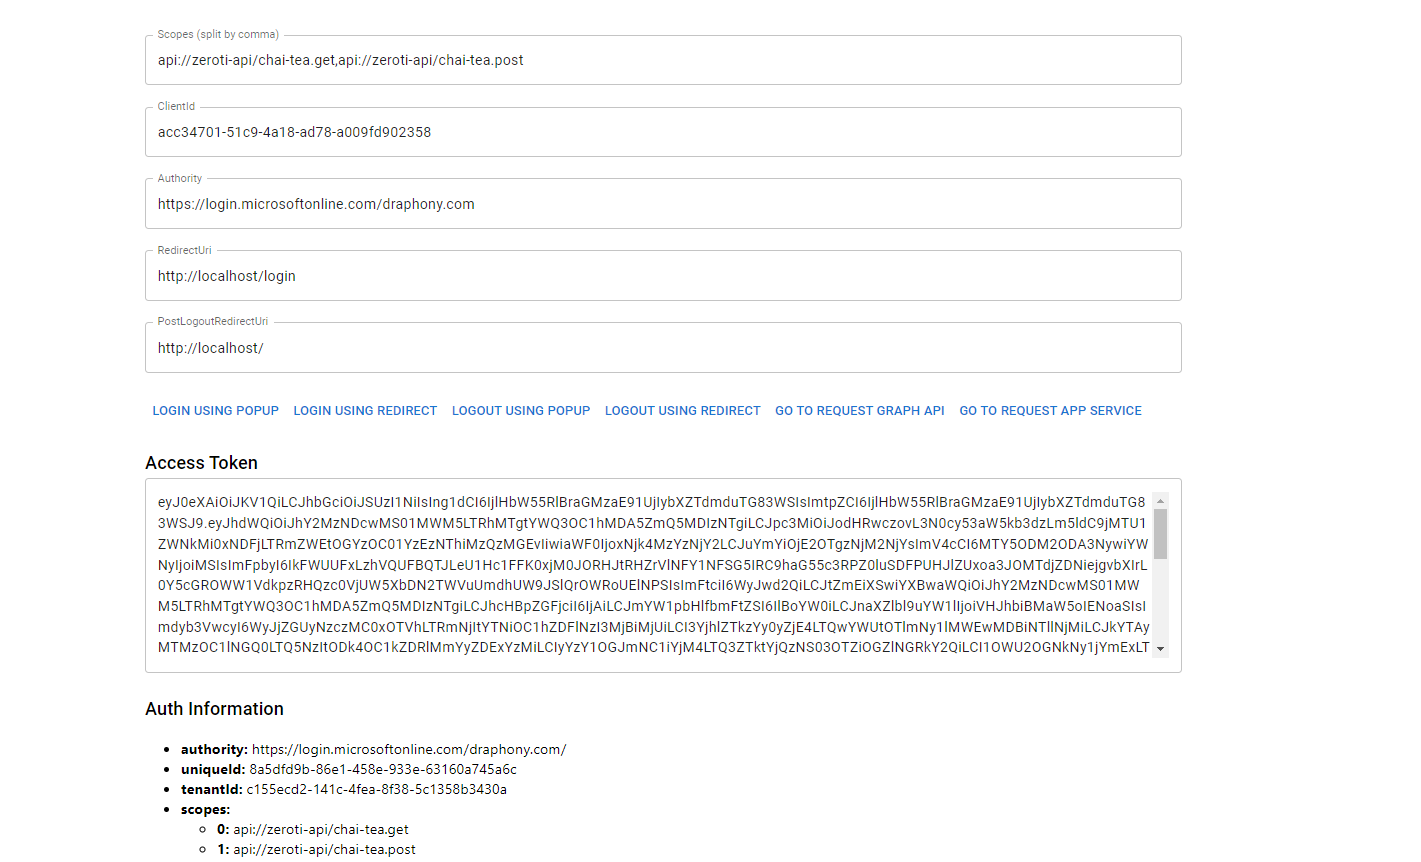
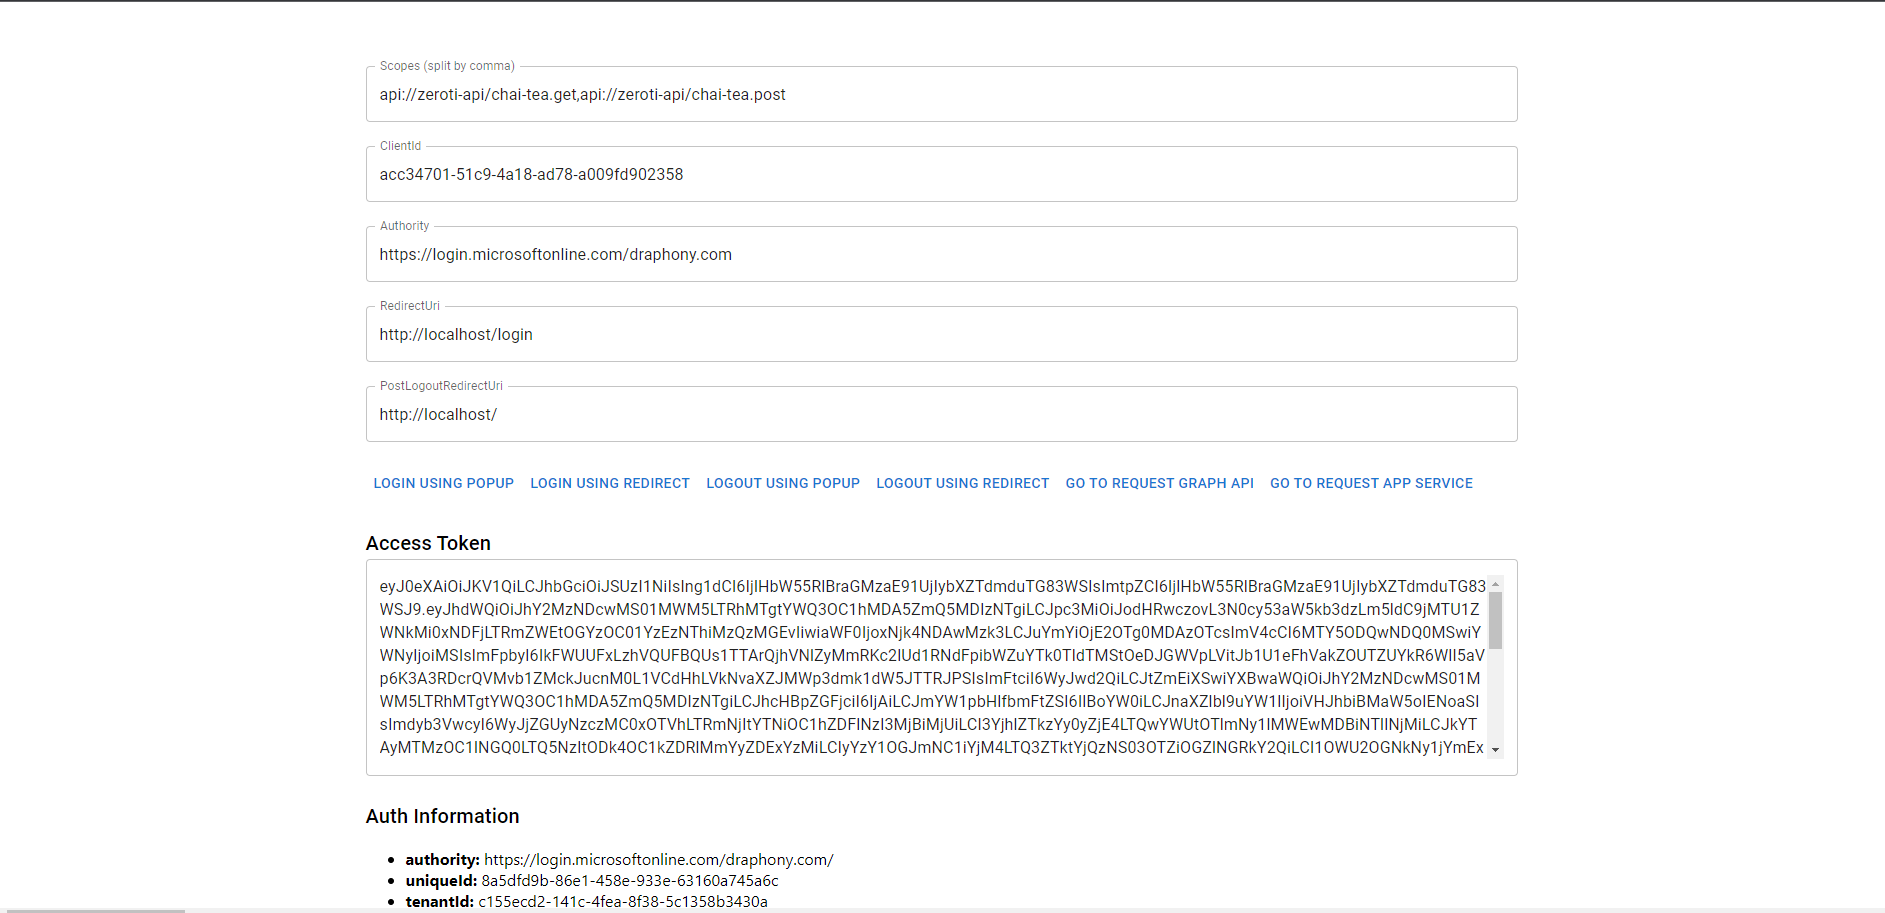
Login on SPA with custom scopes by our organization account:
2. Click Go to request app service and call to /chai endpoint (our source code checks whether chai-tea.get is existed or not and return response). Get data from app service and Post data to app service different with method to call API. 3. Also try changing authority to https://login.microsoftonline.com/common/v2.0 and logging in by another organization’s account, we can still get data.
Then in that organization, in the Enterprise Applications tab, our application will show up, with the same Application ID and different Object ID.
Now, let’s go deeper with admin consent.
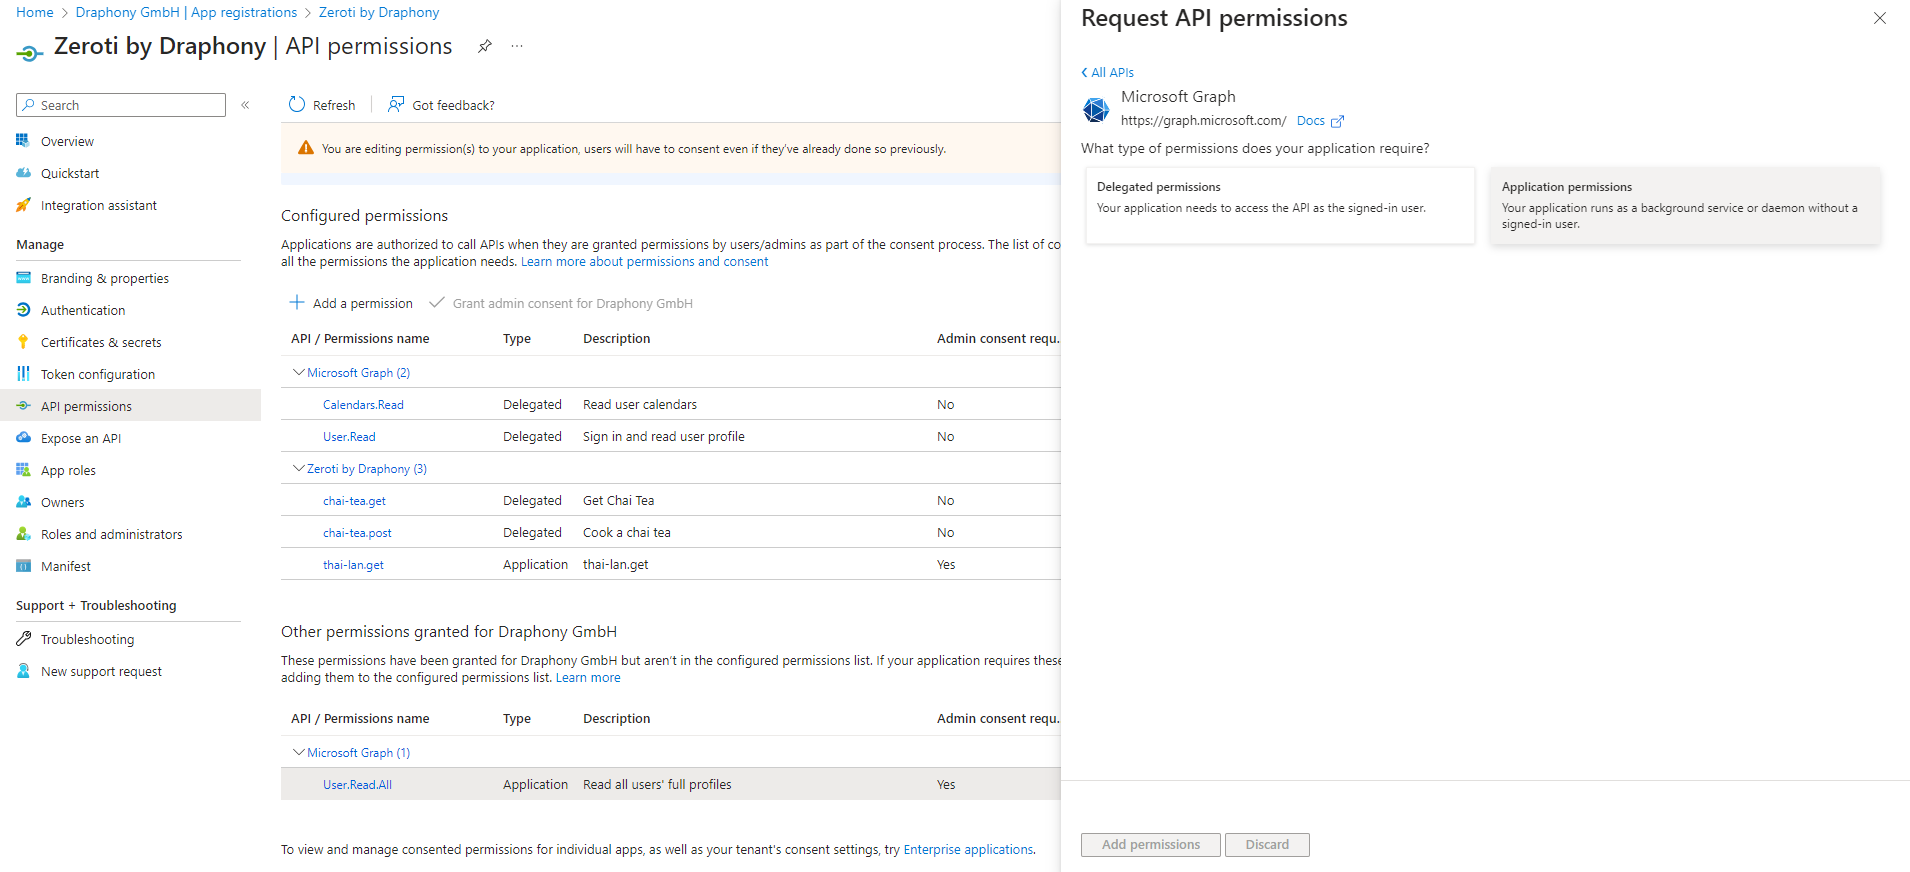
Step 7: Request an Application API permission
1. Navigate to App registrations > <our-app-name> > API permissions and request an API permission. We will choose Microsoft Graph and choose Application permissions. 2. We want to get all users from our tenant so we need to enable User.Read.All and then Add permissions3. Grant admin consent for the permission we’ve just added.
Step 8: Call Graph API from API Service
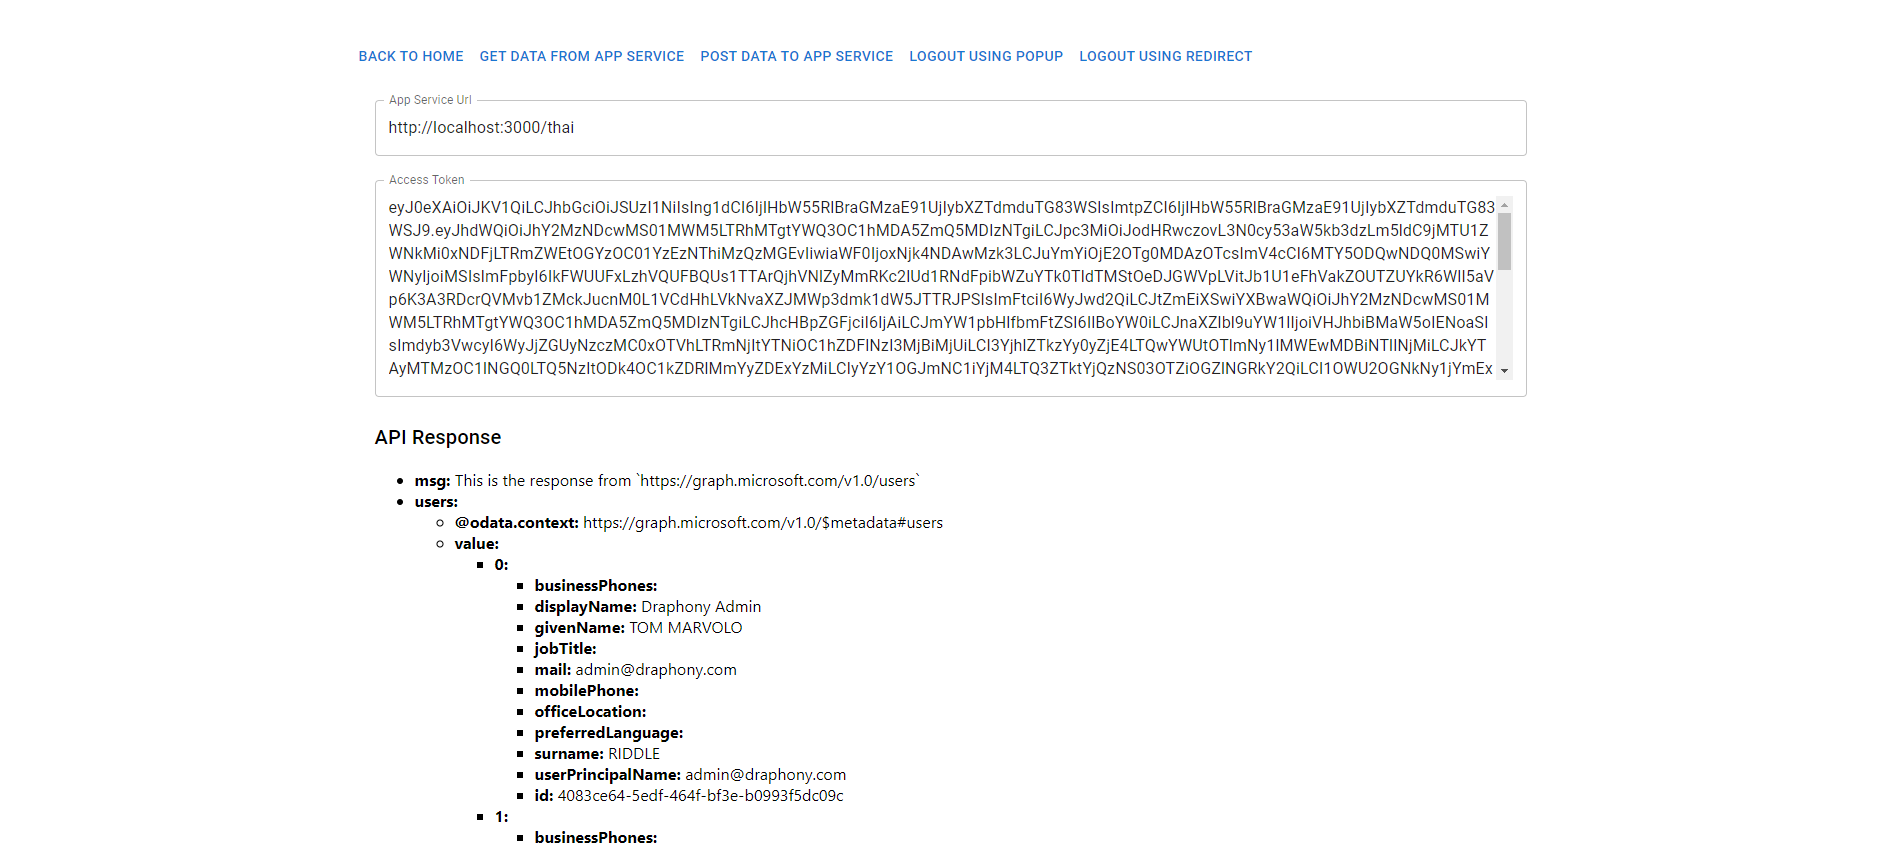
1. Here we will test on local first. Our project is running on http://localhost:3000. Replace the old thai-lan.ts file content with these code below and add environment variables into .env:
import {Request,Response,Router} from "express";exportconstthai=Router();thai.get("/",async(req:Request,res:Response)=>{constclientId=process.env.CLIENT_ID||'your_app_client_id'constclientSecret=process.env.CLIENT_SECRET||'your_app_client_secret'consttenantName=process.env.TENANT_NAME||'draphony.com'constdata=newURLSearchParams();data.append('client_id',clientId);data.append('scope','https://graph.microsoft.com/.default');data.append('client_secret',clientSecret);data.append('grant_type','client_credentials');try{constresponse=await (awaitfetch(`https://login.microsoftonline.com/${tenantName}/oauth2/v2.0/token`,{ method:'POST', headers:{'Accept':'application/json','Content-Type':'application/x-www-form-urlencoded'}, body:data})).json()console.log(response.access_token);constaccess_token:string=response.access_tokenconstusers=await (awaitfetch('https://graph.microsoft.com/v1.0/users',{ headers:{'Authorization':`Bearer ${access_token}`}})).json()res.json({ msg:"This is the response from `https://graph.microsoft.com/v1.0/users`",users});}catch (err) {console.log(err);}});
This is to use your application information (client_id, client_secret) to get am access token without signing in as a user and then use that token and get all users.
Our application has already have User.Read.All role, so that it is able to get all of the users in the tenants
2. Sign in SPA just to be able to call API from API service (since API service is protected by the identity provider) 3. Click on GO TO REQUEST APP SERVICE and change the app service URL to http://localhost:3000/thai to test, then click GET DATA FROM APP SERVICE to use the application token and get all of the users in the tenant, which needs admin consent. In addition, you can edit the code yourself so you can test more cases. Hopefully, this article will help you practice and gain a deeper understanding of enterprise applications as well as custom scope.
Let’s take a hands-on approach and walk through the process of registering an app and setting everything up for our application in Microsoft EntraID to gain a better understanding of app registration. Step 1: Register an application on Microsoft Entra ID. Step 2: Pull our code into your environment to test the application authentication. Step…
In the previous lab (See), we have learn how to deploy solely on Azure using ARM and later Bicep, which are powerful and stable tools. But they have one crucial disadvantage. ARM and Bicep only works for Azure. When dealing with large solution you may want to leverage multiple providers to get the most out…
In this lab, we will use ARM template and Bicep as infrastructure as code solution to deploy, replicate and enforce our environment. After this lab, you will have a better understanding of Azure Deployment, infrastructure as code for Azure with native deployment tools. Enjoy! Throughout the lab, you are asked to open and use the…


 Zum Inhalt springen
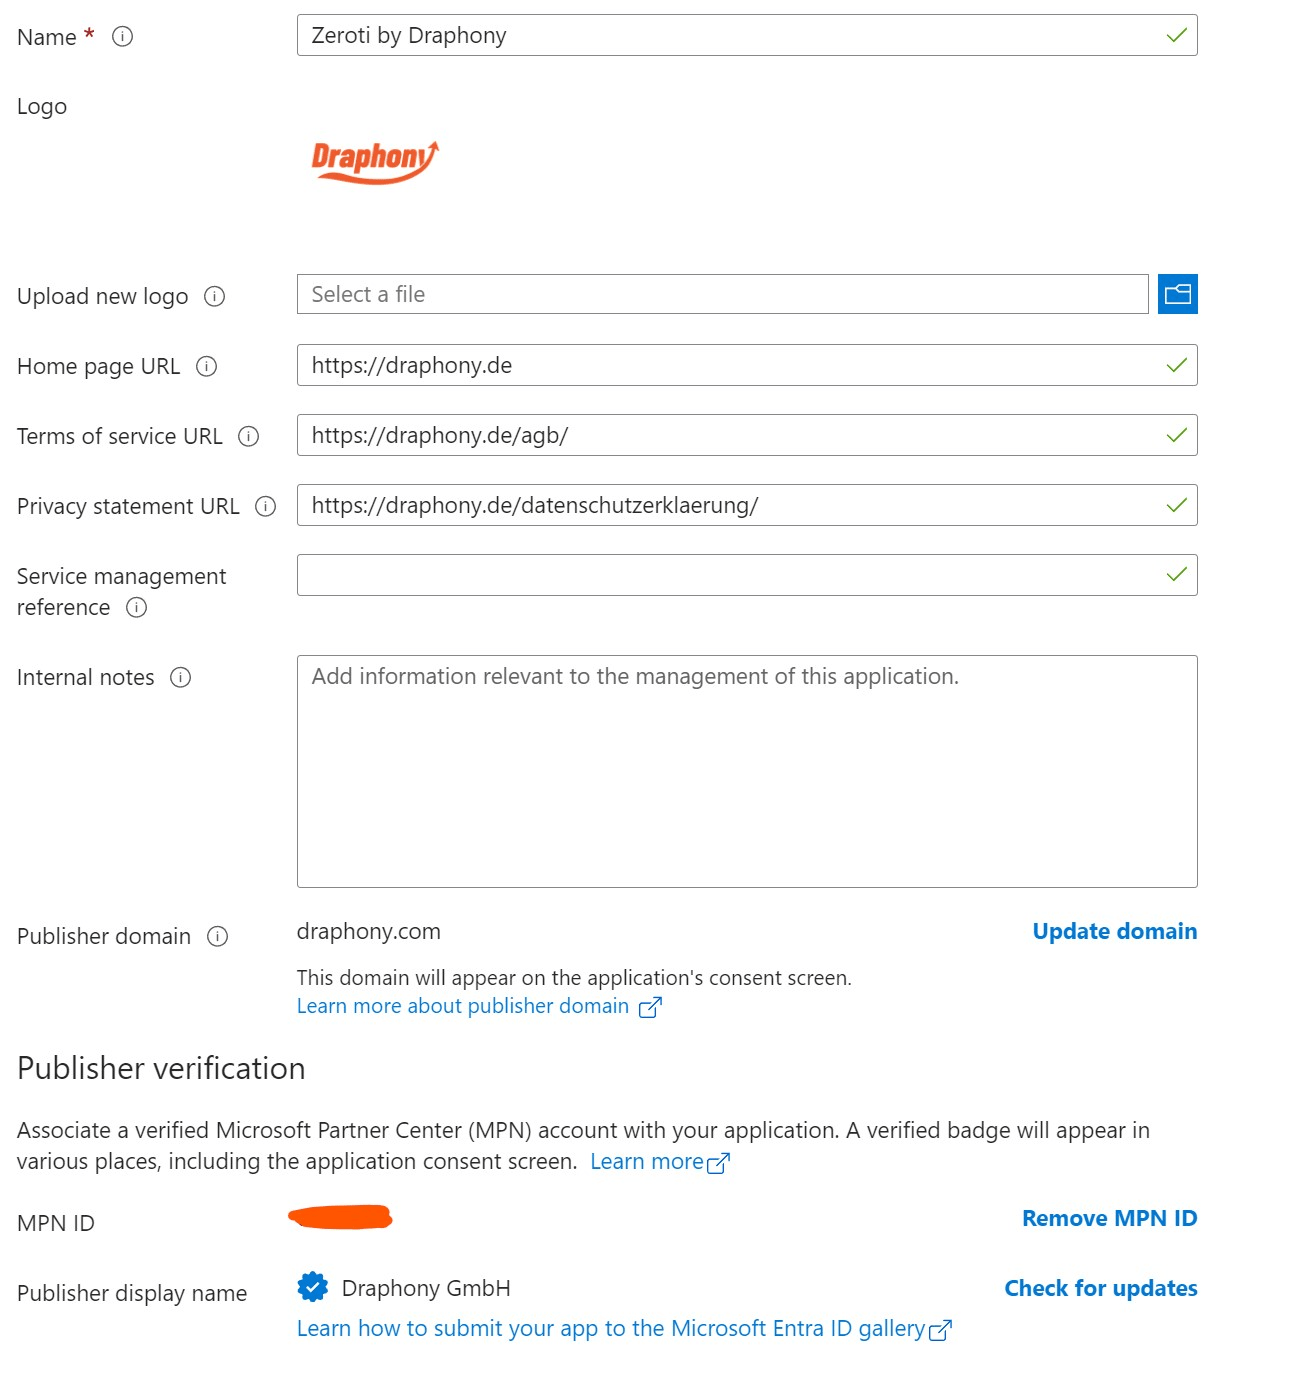
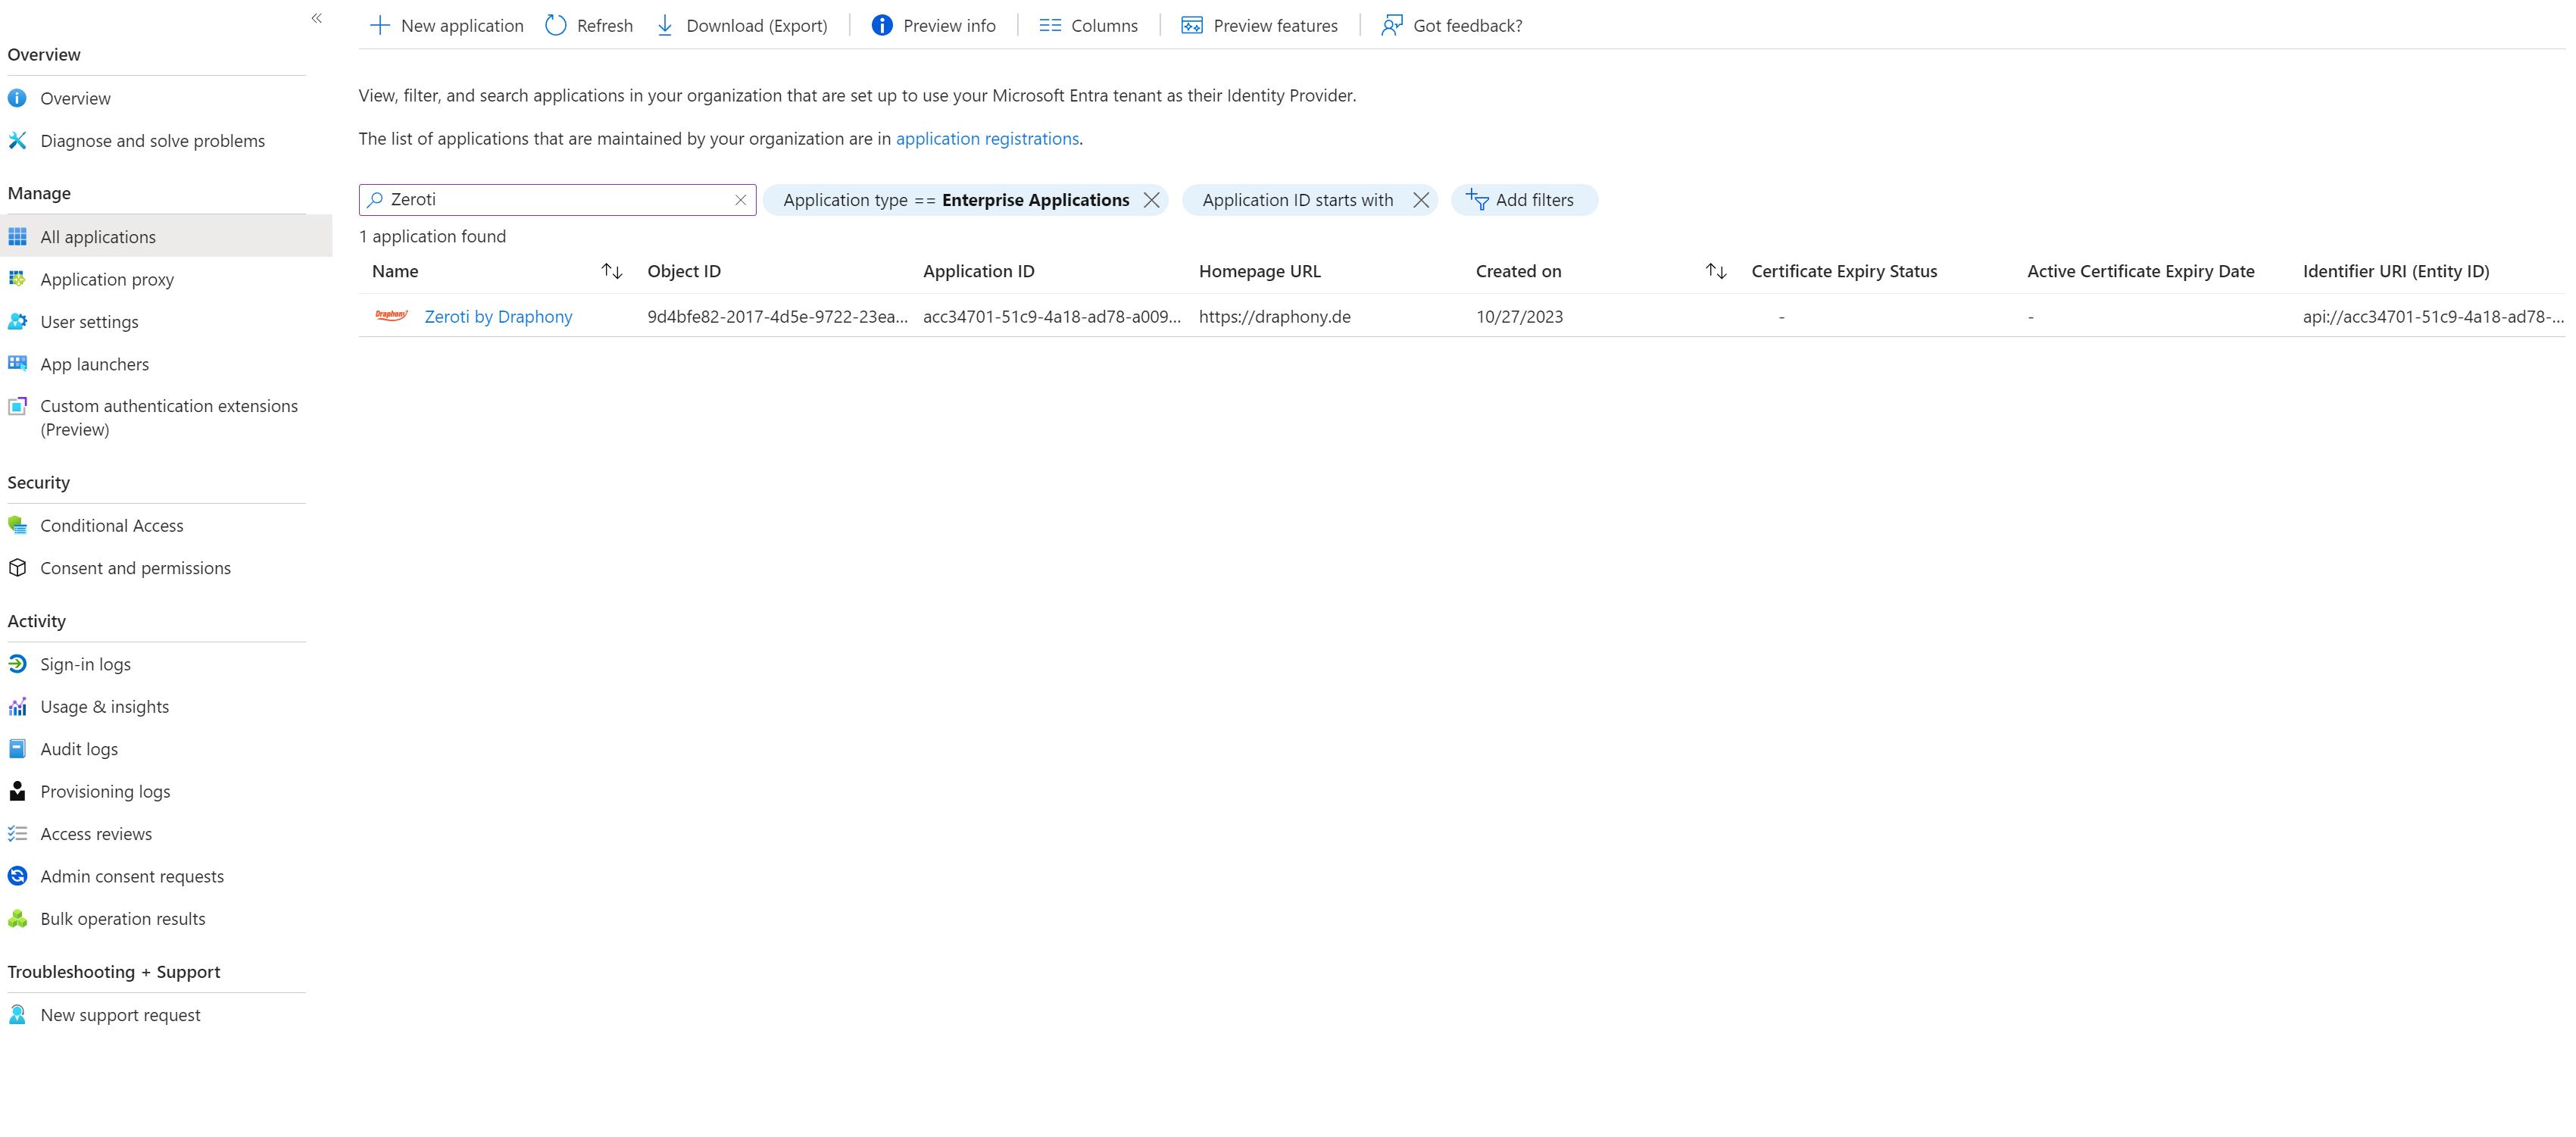 Open, and notice that the client id is the same but the object id is different.
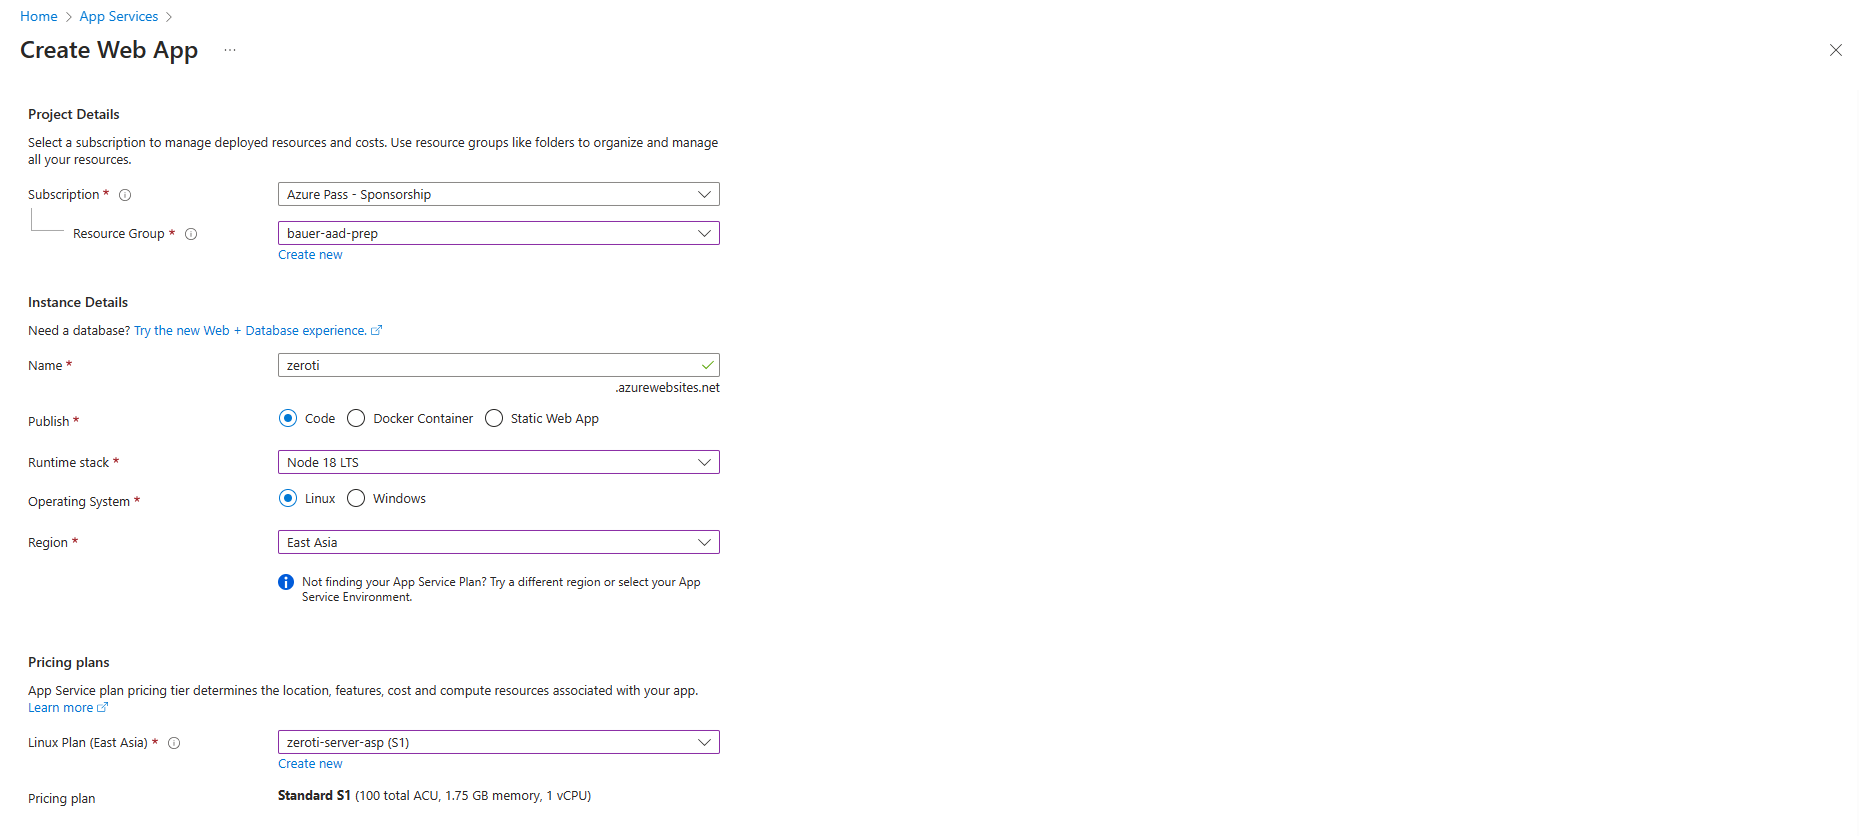 Select your existing subscription, resource group and name the project. In the
 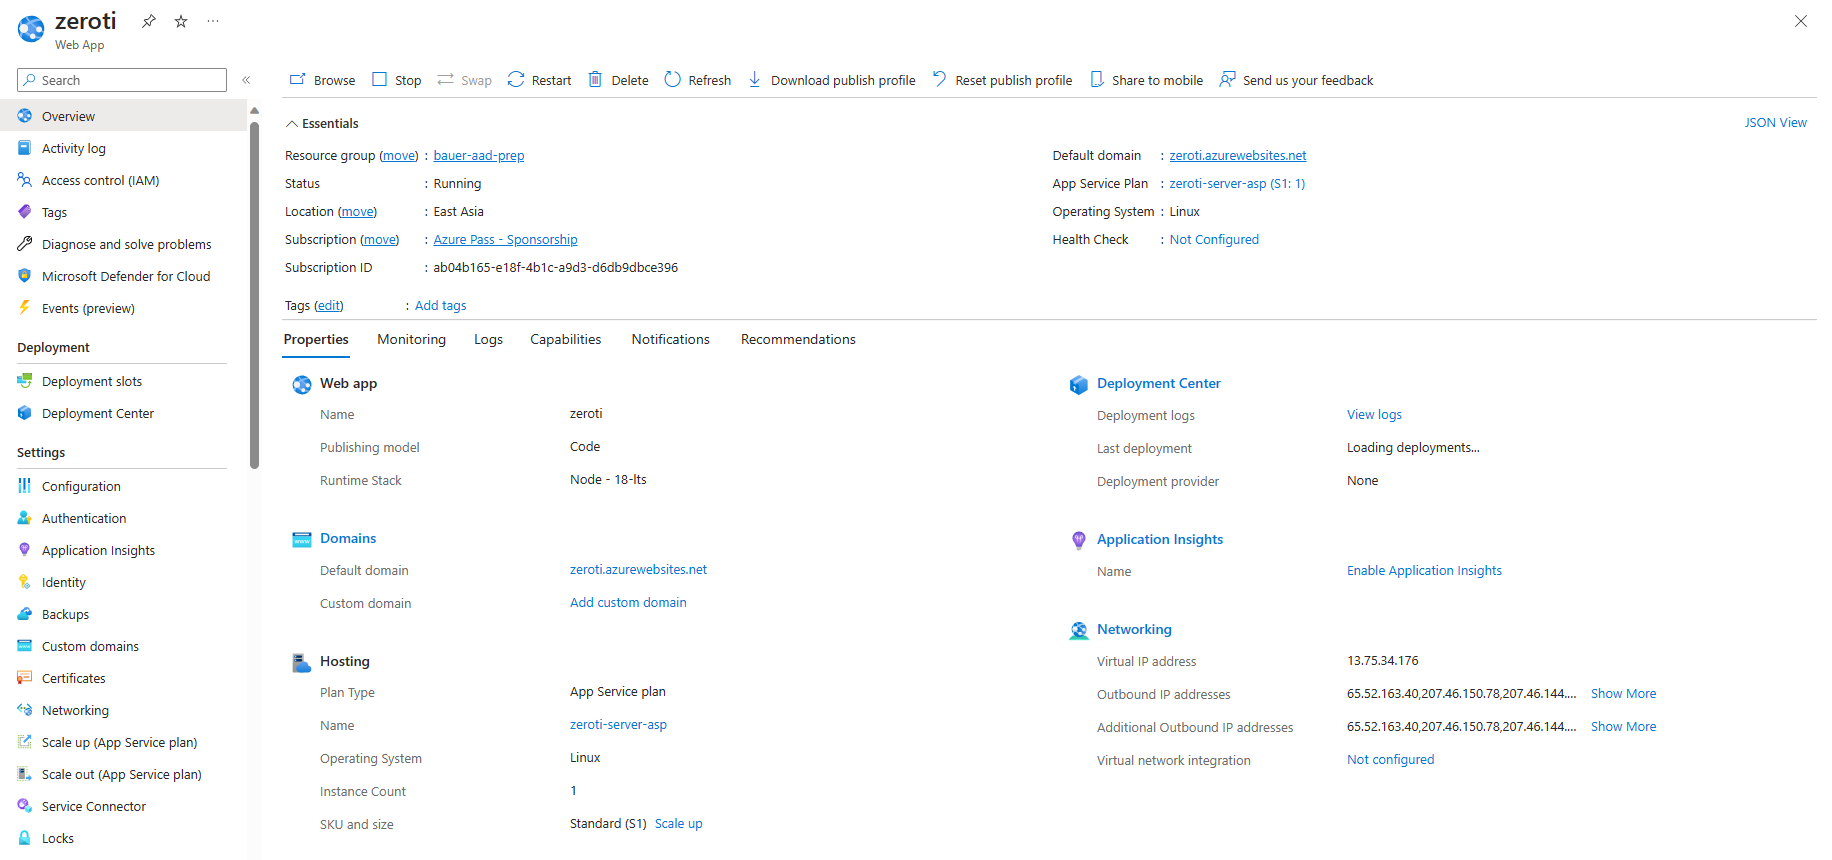 2. Go to Deployment Center to configure Azure Repos to get CI/CD from our NodeJS project on Azure Repository
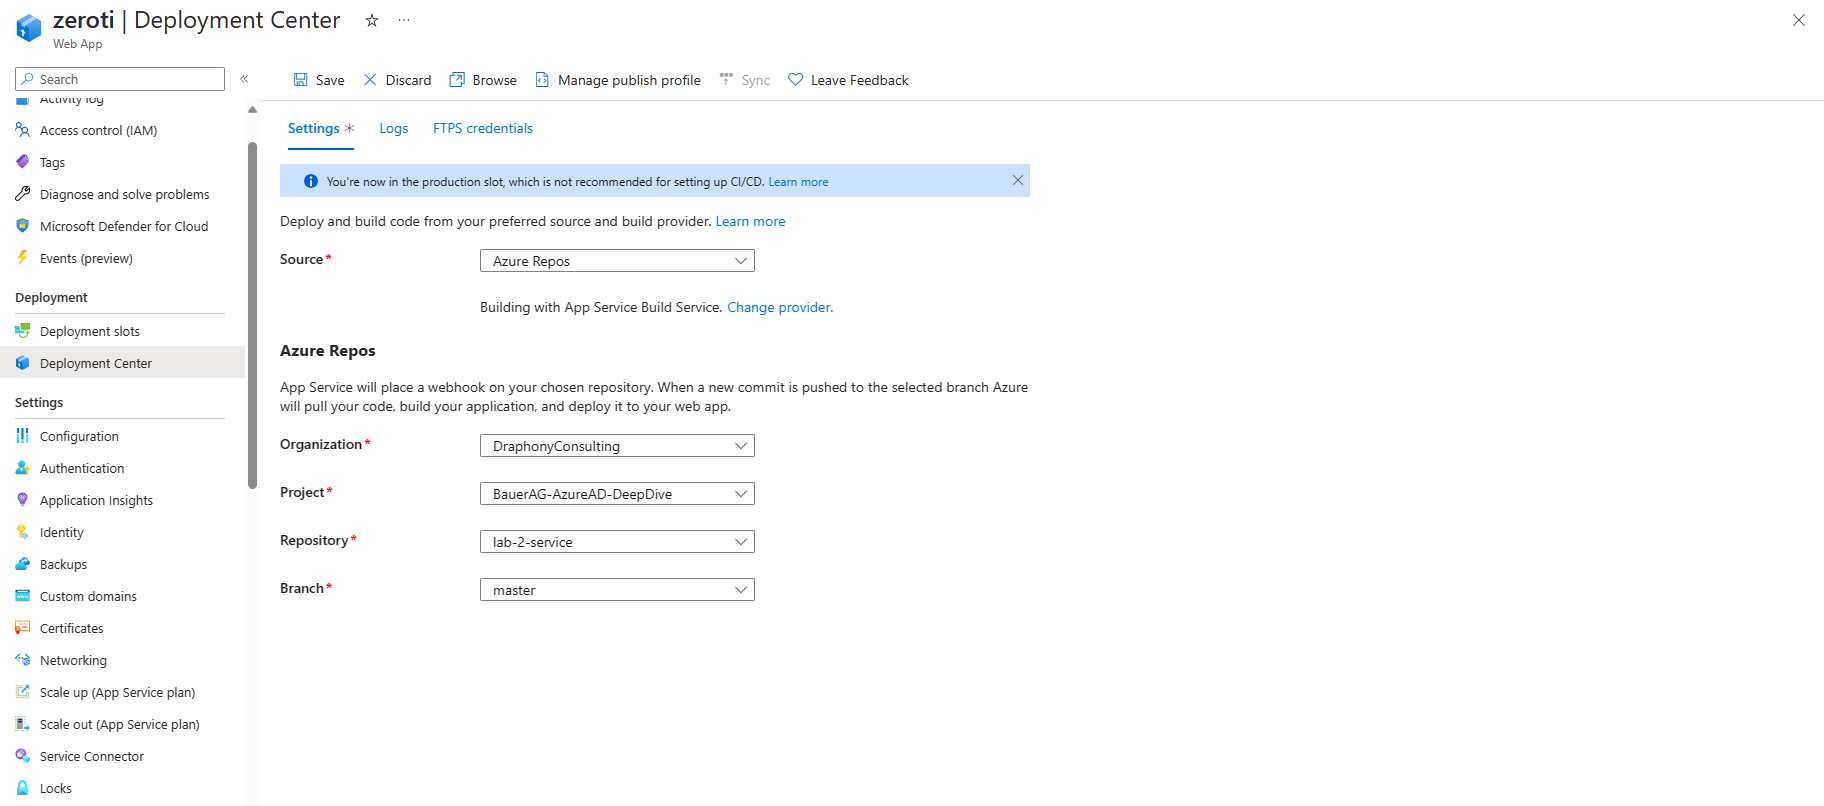
 3. Go to the App Services > Authentication tab, we will add
 4. Add cors in the CORS tab so that our ReactJS SPA can call to this app service. Enter the value of
 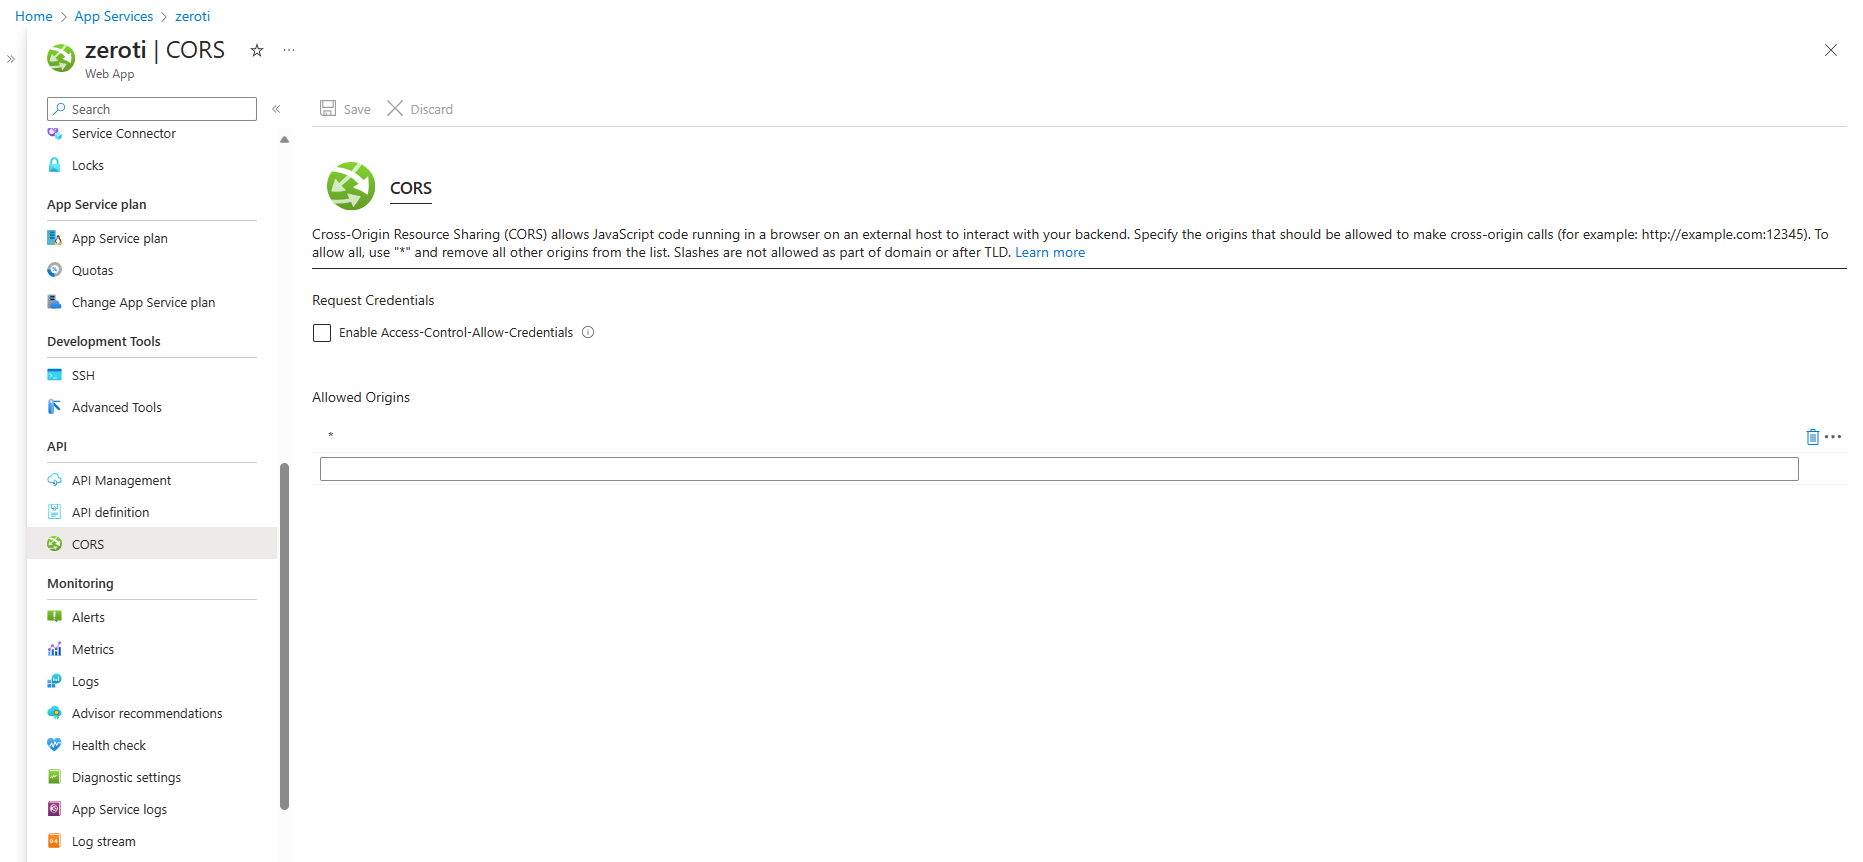 5. Get back into App registrations > Authentication and add redirect URL
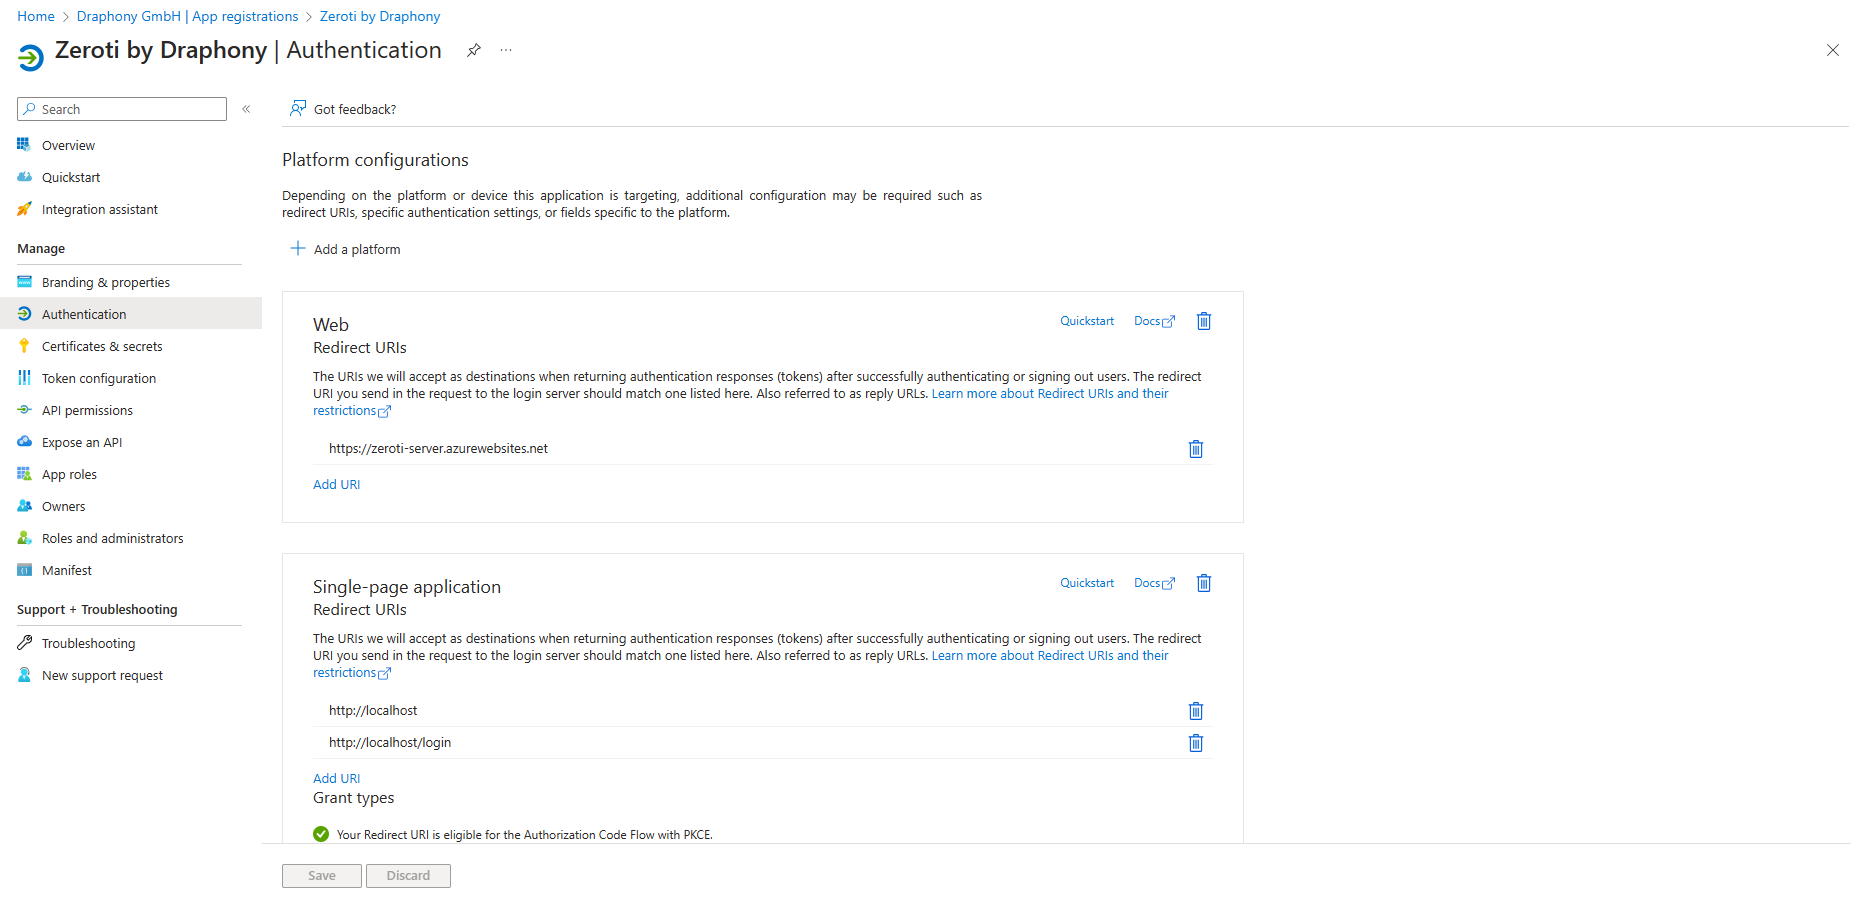
 3. Also try changing authority to
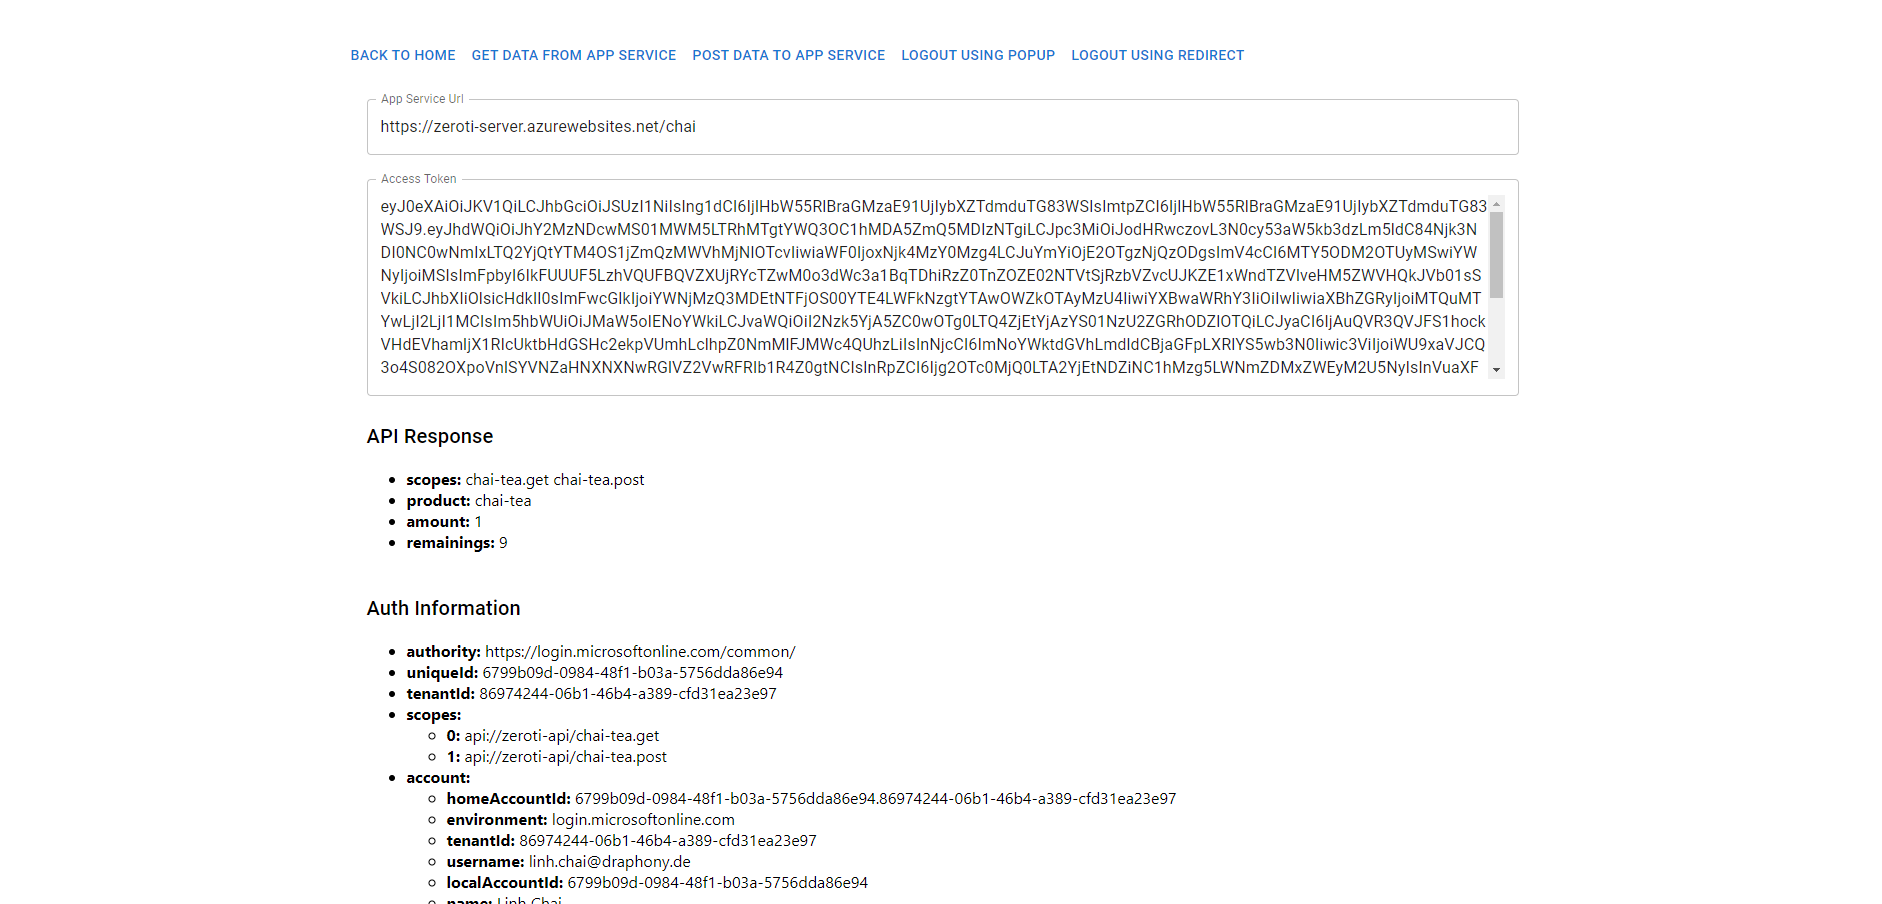
 2. We want to get all users from our tenant so we need to enable
 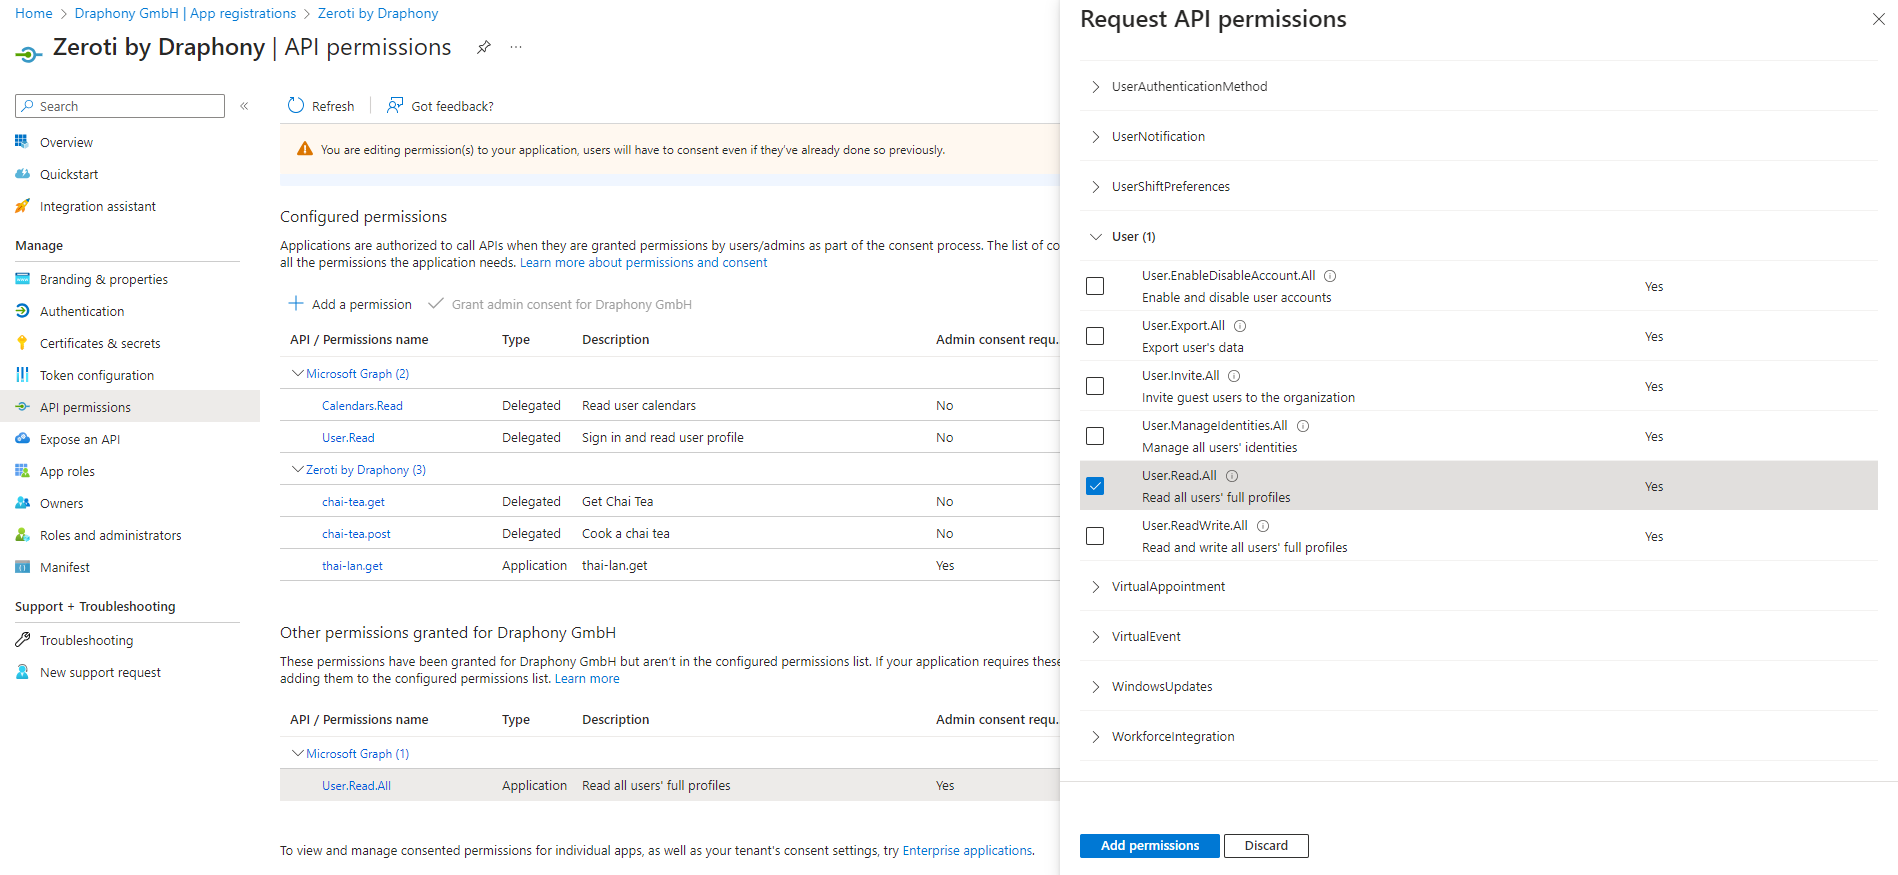 3. Grant admin consent for the permission we’ve just added.
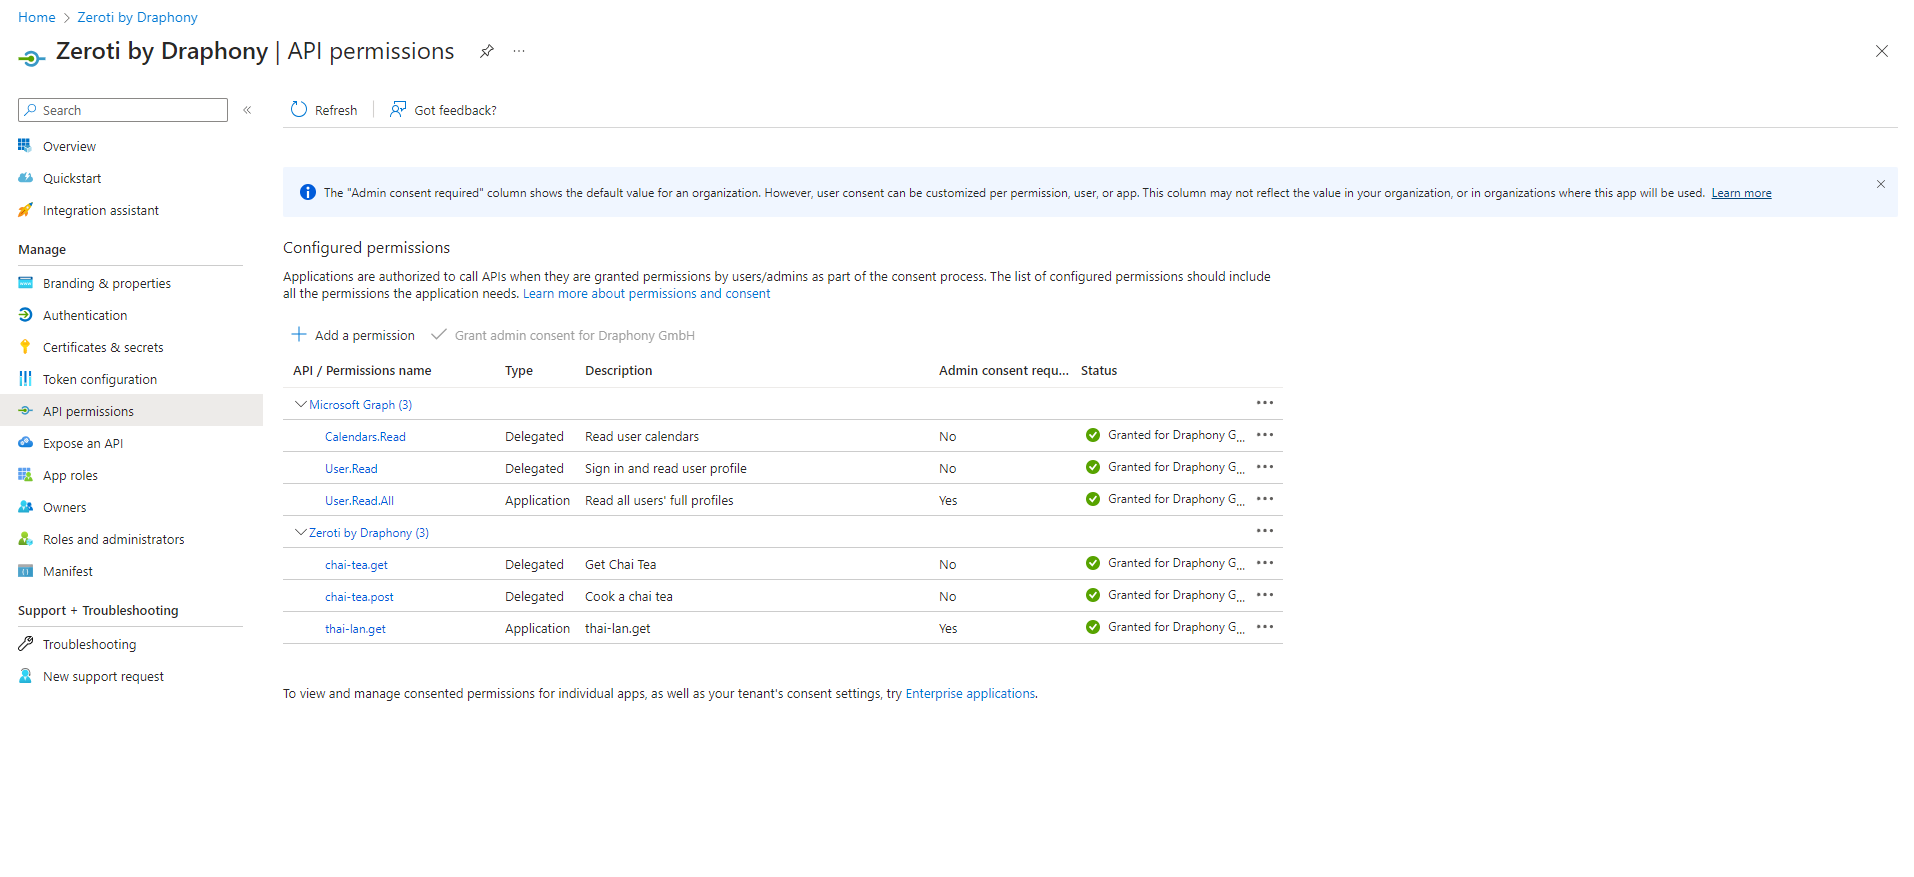
 3.
3.  In addition, you can edit the code yourself so you can test more cases. Hopefully, this article will help you practice and gain a deeper understanding of enterprise applications as well as custom scope.